How to Start Bikepacking: Complete Beginner's Guide (2025)
20+ years testing gear in Colorado backcountry
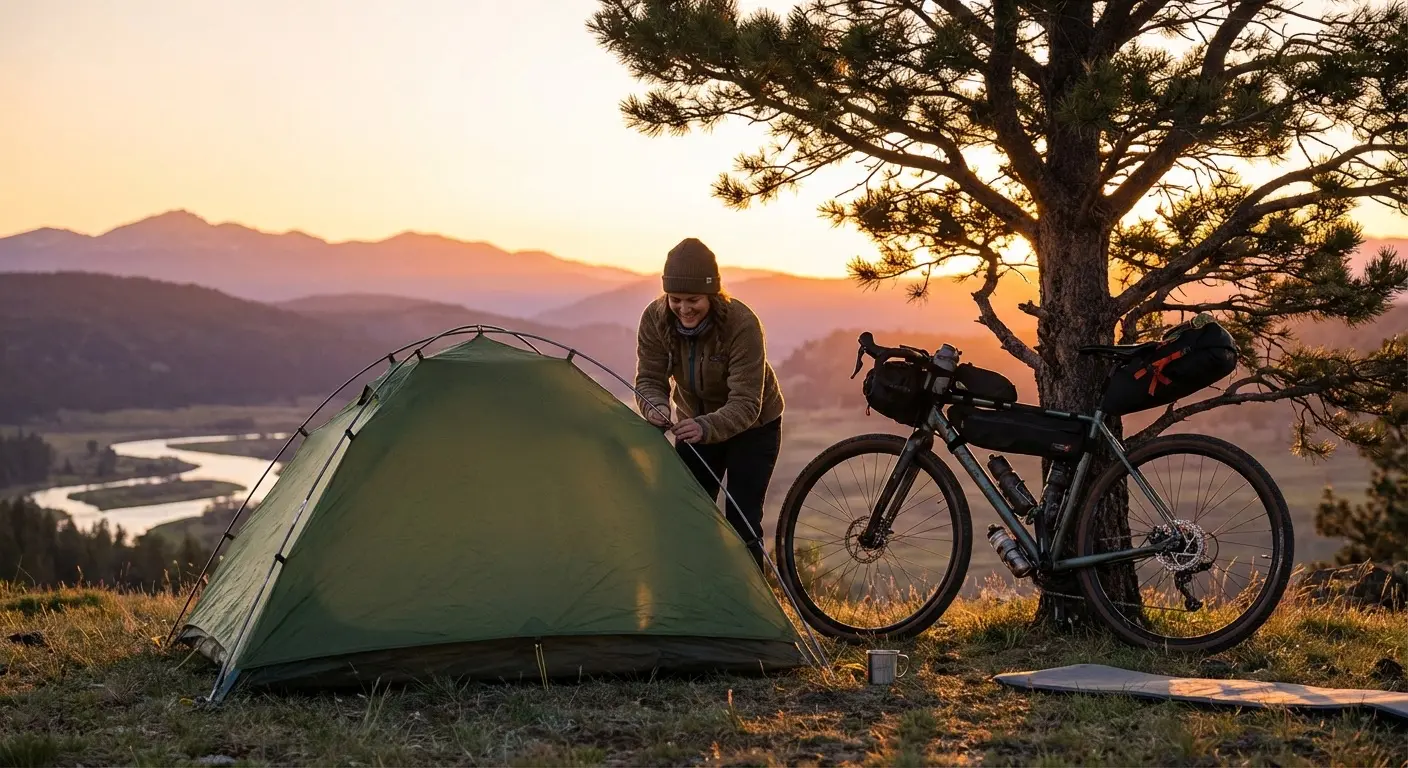
The Freedom of Two Wheels and Open Trails
Imagine waking up in your tent as sunrise paints a mountain ridge gold. Your bike leans against a nearby tree, bags still packed from yesterday's ride through backcountry roads you never knew existed. Coffee brews on a tiny stove while birds provide the only soundtrack. In an hour, you'll pack up and pedal toward the next adventure—no itinerary, no reservations, no rush.
This is bikepacking: the marriage of cycling freedom and camping self-sufficiency. It's not about racing or suffering or expensive gear—it's about discovering that you need far less than you think to have remarkable adventures.
The bikepacking community has exploded in recent years, with resources like BIKEPACKING.com's 101 Handbook and REI's expert guides making it easier than ever to get started. But the fundamentals remain simple: a bike, some bags, basic camping gear, and the willingness to explore.
If you've ever felt the pull of open roads while riding your bike, or wished your camping trips offered more exploration, bikepacking bridges those worlds perfectly.
This guide takes you from complete beginner to confident first-timer. We'll cover what bikepacking actually means, what gear you truly need (spoiler: less than the internet suggests), how to plan a trip that sets you up for success, and what to expect when you finally roll out.
Here's the most important thing: you don't need an expensive bike, ultralight gear, or exceptional fitness. You need curiosity, a willingness to figure things out, and just enough preparation to stay safe and comfortable. Everything else develops through experience.
Let's get you ready for your first overnight adventure.
What Is Bikepacking, Exactly?
Bikepacking is self-supported bicycle travel using bags mounted directly to your bike frame rather than traditional racks and panniers. The simplified setup enables access to terrain that would terrify a loaded touring bike—singletrack trails, gravel roads, rough doubletrack, and remote routes where pavement disappeared decades ago.
But the definition matters less than the philosophy. Bikepacking embraces minimalism. You carry what you need and nothing more. Every item earns its place through genuine utility. The result: a bike that handles almost like normal, letting you actually enjoy the riding rather than wrestling a loaded barge through every corner.
How It Differs from Bike Touring
Traditional bike touring uses racks and panniers—those boxy bags hanging on either side of your wheels. The approach works brilliantly for paved-road travel with heavy loads. Panniers carry enormous amounts of stuff, and racks distribute weight effectively.
The problem: panniers catch on brush, throw off balance on technical terrain, and require racks that many bikes can't accommodate. The setup excels on smooth roads and struggles everywhere else.
Bikepacking bags strap directly to your frame, seatpost, and handlebars. Weight stays centered and low. Nothing sticks out to catch on obstacles. The bike remains nimble enough for actual trail riding. The tradeoff: less total capacity, which forces the beneficial constraint of carrying only essentials.
For a detailed comparison, see our guide on Bikepacking vs Bike Touring: Which Is Right for You?.
Types of Bikepacking Trips
Overnighters involve one night out—perfect for beginners. Ride somewhere interesting, camp, ride home. Low commitment, high reward. If something goes wrong, home isn't far.
Weekend trips extend the adventure with two or three nights. Enough time to reach interesting destinations without requiring time off work. See our Weekend Bikepacking: 2-Day Trip Essentials guide for planning help.
Multi-day adventures span a week or more, often following established routes like the Colorado Trail or Great Divide Mountain Bike Route. These require more planning and experience but offer transformative experiences.
Bikepacking races add competitive structure for those who want it. Events range from local overnighters to multi-thousand-mile epics. Racing isn't required to enjoy bikepacking, but it motivates some riders.
Do You Have What It Takes?
Short answer: probably yes. Longer answer: bikepacking requires less than you think, though honest self-assessment helps plan appropriately.
Fitness Requirements
If you can ride a bike for a few hours and don't collapse after carrying a backpack while hiking, you have enough fitness for a first overnight. This isn't a fitness competition. Nobody's timing you. Going slowly is perfectly fine—often preferable, actually.
That said, bikepacking is harder than unloaded cycling. Extra weight slows climbs and increases fatigue. Plan conservatively for your first trip. Cover less distance than you think you can handle. Pace yourself. Finish strong rather than crawling into camp exhausted.
Fitness builds through practice. Your first trip will be harder than your tenth. That's normal and expected. For structured preparation, see our Bikepacking Fitness: Training for Your First Multi-Day guide.
Skills You'll Need
Basic bike handling: If you can ride confidently on gravel or easy trails, you're ready. Technical singletrack skills develop over time and aren't required initially.
Camping fundamentals: Setting up a tent, cooking simple meals, staying warm at night. If you've car camped before, you understand the basics. The main difference: less gear, more efficiency.
Basic bike repair: Fixing a flat tire is essential. Carry a spare tube, tire levers, and a mini pump—and practice changing a tube at home before hitting the trail. Everything else helps but isn't mandatory for trips close to civilization.
The Right Mindset
Bikepacking rewards flexibility. Plans change. Weather shifts. Routes present unexpected challenges. The bikepackers who enjoy themselves most embrace uncertainty as part of the adventure rather than fighting it.
Problem-solving matters more than fitness or gear. When something breaks or plans fail, figure it out. Make the best decision with available information. Keep moving forward.
Comfort with discomfort helps too. You'll get tired, sore, maybe cold or wet. None of this means failure—it means adventure. The memorable trips usually include some type-2 fun: miserable in the moment, great stories later.
Why Beginners Overthink It
The internet makes bikepacking seem complicated. Gear lists run hundreds of items. Forum debates rage about gram savings and optimal setups. It's overwhelming and mostly unnecessary.
First-time bikepackers successfully completed trips long before anyone wrote gear lists. They brought what seemed reasonable, learned what worked, and adjusted. You can do the same.
As Bicycling magazine's expert guide puts it: "For your first bikepacking trip, the best bike is the one you already own." Start with what you have, learn what works, and upgrade intentionally based on actual experience—not gear reviews.
Perfect preparation is impossible. Good-enough preparation works fine. Your first trip teaches more than months of research. For pitfalls to avoid, see Common Bikepacking Mistakes and How to Avoid Them.
The Gear You Actually Need
Forget the spreadsheets and gram counts. For a first overnight, you need: something to sleep in, something to sleep on, something to carry it all, and your bike. Everything else is refinement.
For comprehensive gear breakdowns, see our Complete Bikepacking Gear Guide. For budget-friendly options, check our Budget Bikepacking: Complete Setup Under $500 guide. Here's the essential overview.
The Bike
You probably already own a suitable bike. Mountain bikes work beautifully. Gravel bikes handle most terrain. Even hybrid or cyclocross bikes work for appropriate routes.
Requirements:
- Fits you comfortably
- Has working brakes and gears
- Can fit at least one frame bag
- Clears tires wide enough for your terrain
That's genuinely it. Your bike might not be optimal, but optimal isn't required. People bikepack on rusty beaters, department store bikes, and heavily modified vintage frames. The best bike is one you have and ride.
Want to optimize your existing bike? See our guide on How to Convert Any Bike for Bikepacking.
Bags
Start with two or three bags. A full setup—frame bag, seat bag, handlebar bag, plus accessories—develops over time as you learn what works for your riding.
Frame bag: Fits inside your main triangle. Carries heavy items like tools, food, and water. Affects handling the least because weight stays low and centered. The Topeak Midloader is an excellent starting point.
Saddle bag: Attaches to your seatpost and saddle rails. Carries bulky but light items like your sleeping bag and extra clothing. Look for designs with internal stiffeners to prevent sway—the Topeak Backloader handles this well.
Handlebar bag: Mounts at the front for quick-access items—rain jacket, snacks, phone. Keep it light to preserve steering feel.
See The 5 Best Bike Bags for Bikepacking for specific recommendations, our Complete Bikepacking Bag & Storage Guide for the full breakdown, and our Bag Materials Guide to understand what makes bags durable.
Shelter
A lightweight tent offers weather protection and bug netting while providing comfortable livable space. One-person tents designed for backpacking work perfectly—they're already optimized for weight and packed size. The Naturehike Cloud-Up 1 is a popular budget-friendly option that packs small enough to fit in a handlebar bag.
Bivies save weight but sacrifice comfort—see our Bivy Guide if you're considering ultralight alternatives. Tarps require skill to pitch effectively. For beginners, a simple tent removes variables and ensures a good night's sleep.
Our guide to The 5 Best One Person Tents for Bikepacking covers the full range of options from budget to premium. Women may also want to check our Women's Bikepacking Complete Guide for additional considerations.
Sleep System
You need insulation below (sleeping pad) and above (sleeping bag or quilt). The ground steals body heat rapidly—a pad provides crucial insulation beyond just cushioning.
Sleeping pad: An inflatable pad around R-value 3-4 like the Therm-a-Rest NeoAir XLite handles three-season conditions while packing reasonably small. Foam pads work too but don't compress. See our Best Sleeping Pads guide.
Sleeping bag: A 30-40°F rated bag covers most three-season trips. Down bags like the Sea to Summit Spark compress smallest; synthetic bags handle moisture better. Either works. See our Best Sleeping Bags guide.
Don't cheap out on sleep gear. Poor sleep ruins trips. This is where extra investment pays dividends.
Clothing
Less than you think. Seriously.
Riding: What you'd wear for a regular ride, plus arm warmers and leg warmers for temperature changes. These packable layers extend your comfort range dramatically for minimal weight.
Camp: One set of warm dry clothes—merino base layer, insulating jacket, warm hat. These stay in your bag until riding stops. Treat them as sacred—nothing ruins a night like damp camp clothes.
Rain: A lightweight rain jacket like the Outdoor Research Helium fits in a pocket and handles unexpected weather.
Footwear: Your regular cycling shoes work. Some riders bring lightweight camp shoes; others skip them to save weight.
For detailed clothing guidance, see our What to Wear Bikepacking: Clothing Essentials guide.
Tools
At minimum: spare tube, patch kit, tire levers, multi-tool, mini pump. This handles the most common mechanical—flat tires—and allows minor adjustments.
See The One Multi-Tool You Need for tool recommendations.
Everything else: Food, water (and means to treat it), phone, basic first aid, headlamp. The list expands based on trip length and remoteness, but overnighters close to civilization don't require expedition-level preparation.
For a complete itemized list, see our Bikepacking Packing List: The Complete Checklist.
Planning Your First Trip
Success on your first overnighter depends more on good planning than good gear. Set yourself up for success with conservative choices.
For comprehensive trip planning guidance, see our Your First Bikepacking Trip: A Complete Planning Guide.
Start Close to Home
Your first trip should be close enough that you could bail out if needed. This isn't pessimism—it's smart risk management. If your sleeping pad fails or weather turns nasty, having an easy escape route removes stress.
Pick a destination 20-40 miles from home with established camping. State parks, national forest campgrounds, or even backyard camping in a friend's rural property all work. Glamorous destinations come later. First priority: learning the process.
Route Selection
Established routes remove navigation stress and guarantee rideable terrain. Apps like Komoot and Ride with GPS offer vetted routes with turn-by-turn directions. BIKEPACKING.com's route finder curates classic routes worldwide with detailed descriptions, water sources, and camping options. Someone else figured out the hard parts—you just follow.
DIY routes offer more adventure but more uncertainty. Road conditions, private property, and route-finding challenges can surprise you. Save these for after you've nailed the basics.
For your first trip, follow an established route or piece together roads and trails you already know. Many local cycling clubs maintain regional bikepacking route databases—check forums and social media for your area. For curated options with beginner-friendly terrain, see our Best Beginner Bikepacking Routes in the US.
Distance Recommendations
Aim for 30-50 miles total—maybe 25-30 on day one, the rest on day two. This seems short but accounts for several factors:
- Loaded bikes climb slower than unloaded
- Finding and setting up camp takes time
- You're learning new systems (packing, unpacking, camping)
- Buffer for mechanicals or route problems
Better to arrive at camp with energy than crawl in exhausted. You can always add miles on future trips.
Terrain Considerations
Match terrain to your bike and skills. Gravel roads and smooth doubletrack work for almost any setup. Technical singletrack requires appropriate tires and riding ability. Paved routes offer easy pedaling but less adventure.
Avoid overly ambitious terrain choices on first outings. Struggling up technical climbs while learning to handle a loaded bike creates unnecessary misery.
Weather and Season
Check forecasts obsessively. Not because bad weather cancels trips—it shouldn't—but because appropriate preparation differs dramatically between clear skies and incoming storms.
Shoulder seasons (spring, fall) offer pleasant riding temperatures but cold nights. Summer brings heat but warmer evenings. Adjust sleep system and clothing accordingly.
Water and Resupply
Know where you'll get water and whether treatment is required. Streams, lakes, and campground spigots all work. Carry enough to reach the next source with margin for error.
Food planning for overnighters is simple: pack what you'll eat plus a bit extra. Detailed meal planning matters for longer trips, not single nights out.
Packing Your Bike
How you pack matters as much as what you pack. Poor weight distribution creates handling problems. Strategic packing makes loaded riding feel almost normal.
Weight Distribution Principles
Heavy items low and centered. Your frame bag carries the densest items—tools, food, water, electronics. This weight sits near the bike's natural center of gravity.
Light and bulky items high and rear. Your saddle bag holds sleeping gear and clothing—things that fill space but weigh relatively little.
Quick-access items front. Handlebar bags work for rain gear, snacks, phone, and anything you need without stopping.
Balance left-to-right. Uneven loading pulls the bike sideways. Pack symmetrically whenever possible.
For detailed packing strategies, see our Weight Distribution Guide.
What Goes Where
Frame bag: Multi-tool, spare tube, pump, snacks, electronics, valuables. This bag stays accessible all day.
Saddle bag: Sleeping bag, puffy jacket, extra clothing, camp shoes if bringing them. Compress everything—air adds bulk without benefit.
Handlebar bag: Rain jacket, arm warmers, current snacks, phone, anything you might need mid-ride.
On your body: Wallet, phone (backup location), absolutely essential items. If the bike disappeared, what can't you replace?
Common Packing Mistakes
Overstuffing bags creates bulges that rub or interfere with pedaling. If it doesn't fit comfortably, you're bringing too much.
Forgetting to secure loose items leads to rattling, rubbing, and items bouncing off. Strap everything tight.
Ignoring bag-to-bike contact points causes frame damage over time. Check that bags don't rub paint or cables.
Test Before You Go
Never start a trip on an untested setup. Ride around the block—or better, complete a short ride—with full bags. Check for rubbing, rattling, or handling problems. Make adjustments. The trailhead is not the place to discover issues.
On the Trail
You're packed, you've planned, you're ready. Here's what to expect when the ride actually starts.
Pace Yourself
Loaded riding is slower than you expect. Accept this. Fighting it leads to exhaustion and misery. Find a sustainable pace and hold it.
Most beginners start too fast—excited energy pushes early pace above sustainable levels. Then fatigue compounds, turning afternoon miles into slogs. Start easier than feels natural. You'll appreciate the conserved energy by day's end.
Eating and Hydration
You burn significant calories bikepacking. Eat more than you think necessary, and eat frequently. Small snacks every hour maintain energy better than large meals every few hours.
Hydration requires attention too. Dehydration sneaks up gradually, manifesting as fatigue and poor decision-making. Drink regularly even when not thirsty.
Navigation
Phone-based navigation works fine for most trips. Apps like Komoot, Ride with GPS, or Gaia provide turn-by-turn directions and offline maps.
A phone mount keeps navigation visible while riding. Keep your phone charged—a 10,000mAh power bank handles most overnight trips. See our guide to the best portable charger for bikepacking.
Save detailed paper navigation for remote expeditions. Overnighters near civilization don't require backup maps, though knowing roughly where you're going without electronics provides peace of mind. For dedicated devices, see our GPS and Navigation Devices guide.
When Things Go Wrong
They will, eventually. The response matters more than the problem.
Mechanical issues: Most are fixable trailside with basic skills. Flat tires happen—fix them and continue. Broken components might require walking to civilization or improvising repairs. Stay calm, assess options, make reasonable decisions.
Weather changes: If rain arrives unexpectedly, rain gear appears. If temperatures drop, add layers. Weather rarely creates genuine emergencies for prepared riders—it just adds adventure.
Fatigue: If you're cooked, make camp early. Nobody's scoring your performance. Listen to your body.
Leave No Trace
Pack out everything you pack in. Camp on durable surfaces. Use established fire rings or skip fires entirely. Dispose of waste properly. The areas we ride depend on responsible use—leave them better than you found them.
Making Camp
After hours in the saddle, camp feels like victory. Here's how to set up efficiently and rest well.
Finding a Campsite
Established campgrounds remove guesswork—you know camping is allowed and facilities exist. Reserve ahead or arrive early during popular seasons.
Dispersed camping on public land (national forests, BLM land) offers solitude and flexibility. Check regulations for your area—rules vary. Generally, camp 200 feet from water and trails on durable surfaces.
Stealth camping—camping discreetly on less-defined land—exists in a gray area. Know local laws, respect private property, and leave no trace. This is a skill for experienced bikepackers, not a first-trip strategy.
Stop looking for camp with at least an hour of daylight remaining. Setting up in darkness is frustrating and error-prone.
Camp Setup Routine
Establish a routine that becomes automatic:
- Park bike securely
- Set up shelter while you have energy
- Inflate sleeping pad, organize sleep system
- Change into camp clothes
- Prepare food and eat
- Organize gear for morning
- Sleep
Consistency reduces forgotten steps and improves efficiency. Your routine will evolve, but having one matters.
Cooking and Food
Keep meals simple. After a long day of riding, elaborate cooking loses appeal. Dehydrated meals like Mountain House freeze-dried options require only boiling water. Tortillas, peanut butter, and honey need no cooking at all.
A small stove and single pot handle most bikepacking cooking. The BRS-3000T ultralight stove weighs just 25 grams and boils water efficiently. Learn to use your stove before the trip—not in the dark while hungry and tired. See our Bikepacking Stoves and Cooking Systems guide for more options.
Wildlife Safety
Bears get the most attention, but basic precautions apply anywhere animals might seek food:
- Store food away from your tent
- In bear country, use bear canisters or hang food properly
- Don't cook or eat in your tent
- Keep a clean camp
Most wildlife avoids humans. The rare exception is habituated animals seeking food—don't be the person who creates them through sloppy food storage.
Breaking Camp
Morning efficiency means more riding time:
- Pack while eating breakfast
- Leave sleeping bag out until last (dew can soak it)
- Check entire site for forgotten items
- Leave no trace of your presence
A practiced bikepacker breaks camp in 20 minutes. Beginners might take an hour. Both are fine—speed develops with experience.
Your First Overnight: A Sample Itinerary
Here's what a successful first overnighter might look like:
Day Before
- Check weather forecast one final time
- Lay out all gear, verify nothing is forgotten
- Charge phone and any electronics
- Pack bags, load bike
- Test ride around the block
- Check tire pressure, squeeze brakes, verify shifting
- Get a good night's sleep
Day One Morning
- Start early—morning hours are often best for riding
- Eat a solid breakfast before departing
- Double-check you have everything
- Begin riding at a sustainable pace
Midday
- Stop for a real lunch break, not just snacks
- Assess progress—are you on schedule?
- Check hydration—have you been drinking enough?
- Minor adjustment of gear if needed
Afternoon
- Continue toward camp at steady pace
- Stop looking for campsite with 1+ hours of daylight
- Choose a spot, set up shelter first
- Organize camp, prepare dinner
Evening
- Eat well—you burned significant calories
- Review the day, enjoy the accomplishment
- Organize gear for morning departure
- Sleep early—you're tired
Day Two Morning
- Wake with sunrise, start breaking camp
- Eat breakfast while packing
- Final site check—leave no trace
- Begin return ride at comfortable pace
- Arrive home with stories and experience
Common Beginner Mistakes
Learn from others' errors. As Bicycling magazine's experts note, these mistakes account for most first-trip frustrations:
Overpacking
The number one mistake, unanimously agreed upon by experienced bikepackers. Every extra item adds weight, takes space, and slows you down. If you're unsure whether you need something, you probably don't.
The 37kg lesson: One experienced bikepacker recalls their first trip vividly: "My bags weighed 37 kilograms total—an insane amount." They packed for every contingency. The result? Grinding up hills at walking pace, exhausted before lunch. Today, that same rider carries around 20 kilograms—almost half—with the same comfort level. The transformation came through brutal honesty about what actually gets used.
Going Too Far Too Fast
Ambitious distances combined with loaded bikes and new skills lead to exhaustion. First trips should feel almost too easy. Build from there.
The 20% rule: "Trying to do too many miles was my biggest early mistake," one veteran admits. The fix is simple: whatever distance you think you can handle, reduce it by 20% and add an extra day if possible. This allows leisure time at camp instead of just eating and immediately passing out. Bikepacking isn't about crushing miles—it's about enjoying the journey.
Inadequate Water Planning
Running low on water creates stress and danger. Know your sources, carry more than minimum, and never pass water without assessing whether to refill.
Not Testing Gear Beforehand
Setting up a new tent in the dark while exhausted is miserable. Use all gear before the trip. Know how it works. Fix problems at home, not in the field.
Critical check before leaving: Verify all tent parts are actually in the tent bag (poles, stakes, rain fly). Many first-timers discover missing components at camp—not a fun way to learn this lesson. Unpack your entire shelter at home and confirm every piece is present before every trip.
The Battery Balancing Act
Modern bikepacking runs on batteries—phone for navigation, GPS for tracking, lights for safety. Managing this electronic ecosystem frustrates more beginners than mechanical issues.
The hierarchy that works:
- Navigation is sacred. Your phone's GPS keeps you on route—protect its battery above all else. Airplane mode when not actively navigating. Screen brightness at minimum readable.
- Lights charge fast. Most bike lights reach full charge in 2-3 hours. Lower priority during the day.
- Charge opportunistically. Every café stop, every campground outlet—top off something. Partial charges don't harm modern lithium batteries.
The rookie mistake: Running your phone as an always-on GPS display kills batteries in hours. Use audio turn alerts instead, keeping the screen off between intersections.
Ignoring Weather Forecasts
Weather determines appropriate gear. Ignoring forecasts leads to being cold, wet, or unprepared. Check obsessively. Adjust plans if necessary.
Forgetting Bike Lights
Many overnighters require some riding in low light. A headlight and taillight add minimal weight and enable safe riding when daylight doesn't cooperate. For detailed guidance, see Night Riding on Bikepacking Trips: Safety and Gear.
What Experienced Bikepackers Wish They Knew
Hard-won wisdom from riders who learned these lessons the difficult way:
Wide tires beat narrow ones. "Can I ride this on a gravel bike?" is the most common question in bikepacking forums. Usually yes—but many riders end up uncomfortable and under-confident on ill-equipped tires. A hardtail or flat-bar bike with high-volume tires (2.0"+) offers cushion, flotation, and traction that transforms rough terrain from survival mode to actual fun.
Tell someone your plan. Share your route, expected campsites, and return time with someone who'll notice if you don't check in. In emergencies, this information can be life-saving. A quick text with a screenshot of your route takes thirty seconds and provides peace of mind for everyone.
Fuel like it matters—because it does. "Bad nutrition made my legs feel like I was cycling through mud," one rider recalls. Pasta, rice, and energy-dense foods keep you moving. Junk food and sugar crashes don't. Your body is the engine; feed it accordingly. Carry more food than you think you need, and eat before you're hungry.
Water paranoia is healthy. Experienced bikepackers develop an almost obsessive relationship with water sources. Never pass reliable water with half-empty bottles. Carry more than minimum. Have a backup plan if your filter fails. Dehydration creates problems that compound rapidly in ways that sneak up on you.
The perfect setup doesn't exist—yet. Every experienced bikepacker has a gear closet full of "wrong" purchases. First attempts rarely nail the optimal setup. Accept that refinement happens over multiple trips, not through research alone. Buy reasonably, learn what works, and upgrade based on actual experience rather than forum recommendations.
Slow down to enjoy it. The riders having the best time often cover the fewest miles. Stopping to swim in a creek, taking an extra coffee break, or exploring an interesting side road creates memories that another 10 miles won't. Speed comes later, if you want it. Enjoyment comes from being present.
Leveling Up
Your first overnight is just the beginning. Here's where to go from there.
From Overnighters to Multi-Day
Each successful trip builds skills and confidence. Overnighters teach the basics. Weekend trips extend duration and distance. Eventually, week-long adventures become approachable.
Growth happens naturally. You'll discover what gear works, what routines make mornings efficient, and how your body handles back-to-back days. No rush—the journey is the point.
Joining the Community
Bikepacking communities exist online and locally. Forums, Facebook groups, and local clubs connect riders for group trips and shared knowledge. The community tends toward friendliness—most experienced bikepackers love helping newcomers.
Group rides with experienced bikepackers accelerate learning. Watching others pack, set up camp, and solve problems teaches faster than solo experimentation.
Races and Events
Organized events range from casual group overnighters to ultra-endurance races spanning weeks. Participating isn't required to enjoy bikepacking, but events provide structure, community, and motivation for some riders.
Start with casual group rides or shorter events. Multi-day races require significant experience and preparation.
Building Your Ideal Setup
Your gear evolves through experience. First trips reveal what works and what doesn't. Upgrades happen incrementally based on actual needs, not theoretical improvements.
The setup you start with won't match the setup you use in three years. That's normal and expected. Experience teaches more than gear reviews.
FAQ
How fit do I need to be?
Fit enough to ride your bike for several hours and carry camping gear. You don't need exceptional fitness—just adequate fitness for your planned distance. Start conservatively; fitness develops through riding.
Can I bikepack solo as a beginner?
Yes, with appropriate precautions. Choose established routes with cell coverage for first solo trips. Tell someone your plans and expected return. Carry enough supplies to handle emergencies. Solo trips offer freedom but remove backup options—plan accordingly.
What if it rains?
You get wet, then dry out. Rain gear keeps core body temperature manageable. Tents keep sleep systems dry. Prepare for rain, don't fear it. Some of the best adventures include memorable storms.
How do I find routes?
Bikepacking.com's route finder covers established routes worldwide. Apps like Komoot and Ride with GPS include user-created routes with ratings and descriptions. Local clubs often maintain route information for regional options.
Do I need a special bike?
No. Most bikes work for appropriate terrain. Mountain bikes, gravel bikes, and even hybrids handle bikepacking. Specialized bikes offer refinements but aren't prerequisites.
What about safety?
Same principles as any outdoor activity. Know your limits, plan conservatively, carry appropriate gear, tell someone your plans. Bikepacking isn't inherently dangerous—risks are manageable with reasonable precautions.
The Adventure Awaits
You now know everything required for your first bikepacking overnight. The rest comes through doing.
Pick a weekend. Choose a nearby destination with easy camping. Pack conservatively. Ride out, sleep under stars, ride home. That's it. That's bikepacking.
Your first trip won't be perfect. You'll forget something, overpack something else, and learn lessons no guide can teach. That's not failure—that's the process. Every experienced bikepacker started exactly where you are now.
For detailed gear recommendations, see our Complete Bikepacking Gear Guide. For bag selection help, explore The 5 Best Bike Bags for Bikepacking. For shelter options, read The 5 Best One Person Tents for Bikepacking.
Stop researching and start riding. The trails are waiting.


