Complete Bikepacking Bag & Storage Guide: Carry Everything Without the Weight Penalty
20+ years testing gear in Colorado backcountry
Your Bag System Makes or Breaks Every Adventure
The bike matters. The route matters. But the moment you load gear onto your bicycle, your bag system determines everything—how much you carry, how the bike handles, and whether loaded riding feels like freedom or fighting your own equipment.
Traditional touring solved this problem with panniers. Four boxy bags hanging off racks, enough capacity for anything. But panniers swing on rough terrain, catch on trees, and make technical riding nearly impossible. The moment gravel turns to singletrack, those swinging side bags become a liability.
Modern bikepacking bags solve this elegantly. By strapping directly to your frame, handlebars, and seatpost, they keep weight centered and low. No racks required. Your bike handles like a bike—just a slightly heavier one. Technical terrain becomes possible. Adventures become longer. Carrying capacity limitations become creative puzzles rather than frustrating constraints.
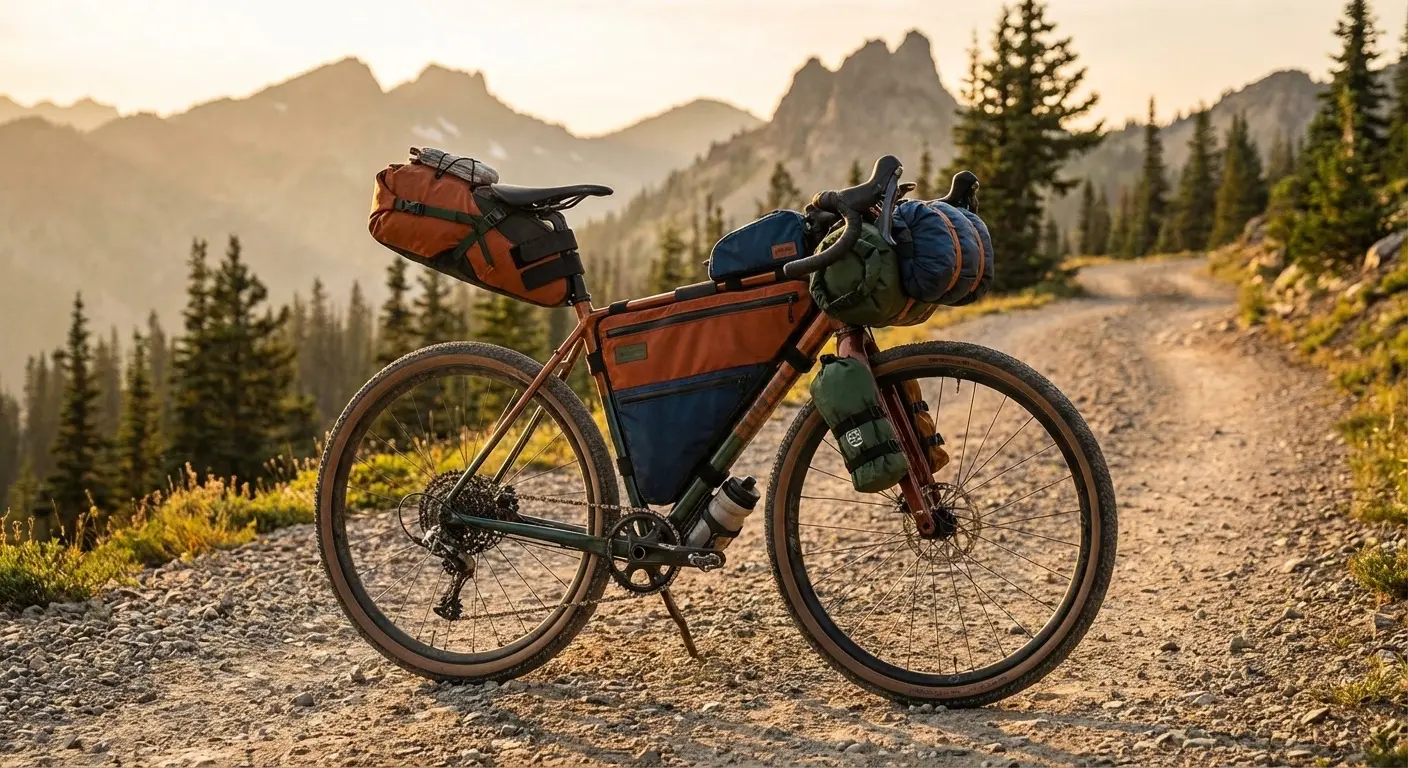
The three-bag system has emerged as the gold standard: a frame bag for heavy essentials, a saddle pack for bulky lightweight items, and a handlebar roll for quick-access gear. Together, they create 20-40 liters of usable capacity while preserving your bike's character.
This guide covers everything you need to know about bikepacking storage—from understanding each bag type to optimizing weight distribution, from choosing the right system for your adventures to waterproofing strategies that actually work. Whether you're planning weekend overnighters or month-long expeditions, the principles here will help you carry everything you need without paying a handling penalty.
For a broader look at all the gear you'll need, see our Complete Bikepacking Gear Guide.
Understanding Bag Types
Before diving into specific recommendations, understand what each bag type does best. Every position on your bike offers different advantages and trade-offs.
Frame Bags
Frame bags occupy the main triangle of your bike—the space between top tube, seat tube, and down tube. This is prime real estate: low, centered, and protected.
Full-frame bags fill the entire triangle, maximizing capacity (typically 6-12 liters). They're ideal for expedition riding where every liter matters. The trade-off: they block water bottle mounts inside the frame, requiring alternative hydration solutions.
Half-frame bags occupy only part of the triangle, usually the top portion. They preserve water bottle access on the seat tube—crucial for longer rides in hot conditions. Capacity runs smaller (3-6 liters typically), but the hydration convenience often outweighs the lost space.
Best uses: Heavy items that benefit from low, centered positioning—tools, spare tubes, pumps, food, electronics, batteries. The frame bag should carry your densest gear.
Key considerations: Measure your frame triangle carefully. Bikes vary enormously, and frame bags need to fit without interfering with pedaling, cable routing, or shock pivots on full-suspension bikes.
For detailed frame bag recommendations, see our Best Frame Bags for Bikepacking guide.
Saddle Bags (Seat Packs)
Saddle bags attach to your seatpost and saddle rails, extending behind the seat. They've become the workhorse of bikepacking storage, often carrying the most volume.
Modern designs range from 3 liters (essentially extended saddle pouches) to 20+ liters (expedition-scale packs). Most bikepackers find 8-14 liters hits the sweet spot for overnight to multi-day trips.
Best uses: Lightweight but bulky items—sleeping bags, tents, extra clothing, rain gear. The saddle position can handle volume without dramatically affecting handling, as long as the contents are light.
Key considerations: Stability matters enormously. Cheap saddle bags sway side-to-side on rough terrain, throwing off your balance and wearing mounting points. Look for internal stiffeners, anti-sway baffles, or harness systems that lock the bag in place. Also consider dropper post compatibility—if you use one, you'll need a bag designed for shorter seatpost exposure.
For specific product recommendations, see our Best Saddle Bags for Bikepacking guide.
Handlebar Bags
Handlebar bags mount at the front of your bike, utilizing the space above and ahead of your handlebars. Most use a harness system that stays mounted, paired with a removable dry bag you can grab and go at camp.
Harness + dry bag systems offer maximum versatility. Any waterproof dry bag works—stuff in your shelter, clothing, or camp supplies without worrying about organization. At camp, pull the whole bag and carry it to your tent.
Integrated handlebar bags provide better organization with internal pockets and compartments. They're less versatile but faster for accessing specific items during the ride.
Best uses: Shelter components (tent, bivy, tarp), camp clothing, puffy jacket for chilly descents, items you might need to access without fully stopping.
Key considerations: Weight up front affects steering feel more than weight elsewhere. Keep handlebar bag contents light relative to total load. Watch for cable clearance—shifting and brake cables need room to move, especially on bikes with wide bars.
Accessory Bags
Beyond the core three, smaller bags expand capacity and improve access to frequently needed items.
Top tube bags sit on top of your top tube, just behind the stem. They're perfect for snacks, phone, sunscreen—anything you want to grab while riding. Some designs bolt on; others use straps. Capacity runs 0.5-2 liters typically.
Feed bags mount on either side of your stem, creating cockpit storage for nutrition and small items. Popular in racing, they work equally well for everyday bikepacking.
Fork bags and cargo cages utilize your fork legs for additional storage. "Anything cages" hold water bottles, dry bags, or specialized fork bags. This position is excellent for heavy items like water or fuel, keeping weight low and distributed forward.
Stem bags mount directly to your stem, creating a small pocket for immediate essentials—phone, snacks, or a small camera.
Choosing the Right Bag System
No single bag system works for everyone. Your ideal setup depends on trip length, terrain, and what bike you're riding.
Trip Duration Considerations
Day rides and credit-card touring: Minimal storage needs. A frame bag or top tube bag handles tools, snacks, and phone. Some riders add a small saddle bag for a layer and repair supplies. Total capacity: 5-10 liters.
Overnighters: The core three-bag system shines here. Frame bag for tools and heavy items, saddle bag for sleeping kit, handlebar bag for shelter. Total capacity: 20-30 liters covers most overnighters in three-season conditions.
Multi-day adventures: Add accessory bags to the core system. Fork bags for extra water, top tube bags for food access, possibly a larger saddle bag. Total capacity: 30-45 liters handles most self-supported multi-day trips.
Expedition riding: Maximum capacity becomes the goal. Full-frame bag, large saddle pack, handlebar bag, fork bags, stem bags—use every mounting point available. Some riders add small panniers for true expedition capacity. Total capacity: 45-60+ liters for cold-weather or extended wilderness travel.
The Bag System Evolution
Here's how most bikepackers' bag systems evolve over time—and what you can learn from their progression:
Year 1 (Learning): Start with an affordable 3-bag setup. Discover what features you actually need versus what marketing suggests. Make mistakes cheaply.
Year 2 (Refinement): Upgrade one or two bags based on specific frustrations. Usually the saddle bag (stability issues) or frame bag (fit problems) first. Keep what works.
Year 3+ (Optimization): Bags become purpose-specific. Maybe a small setup for overnighters, larger for expeditions. Add accessory bags based on proven needs, not speculation.
The insight: Experienced bikepackers rarely have matching "systems" from one brand. They have franken-setups that evolved through actual use. Your ideal setup will be unique to your riding style.
If you're just getting started, see our Bikepacking for Beginners Guide for a complete introduction to planning your first trips.
Terrain Considerations
Smooth gravel and dirt roads: Any bag system works. You can prioritize capacity over stability, knowing that weight shifts won't create dangerous handling situations. Cheaper bags with less sophisticated mounting work fine here.
Technical singletrack: Tight, secure mounting becomes critical. Bags that shift or sway make technical riding difficult and potentially dangerous. Invest in quality mounting systems, pack carefully to prevent internal shifting, and test your loaded setup on easier terrain first.
Mixed terrain: Versatility matters most. Your bags might handle buffed gravel in the morning and rocky singletrack in the afternoon. Choose bags that stay secure across varied conditions, even if it means slightly less capacity.
Bike Compatibility
Road bikes: Limited frame space and narrow tire clearance restrict options. Smaller frame bags, narrow saddle bags, and compact handlebar systems work—but total capacity stays lower than other platforms. Ensure bags don't interfere with your narrow tire clearance.
Gravel bikes: Ideal bikepacking platforms. Most gravel frames include generous mounting points, clearance for bags, and stable geometry. Nearly any bag system works. This is the sweet spot for bikepacking-specific bikes.
Hardtail mountain bikes: Excellent capacity and capability. Watch for front suspension compatibility—some handlebar bags interfere with fork travel. Frame bags need to clear suspension linkages if present. Otherwise, these bikes carry loads beautifully.
Full-suspension mountain bikes: The most challenging platform. Rear suspension limits saddle bag options (the bag can contact the rear wheel at full compression). Frame space is often compromised by shock linkages. Many riders rely more heavily on handlebar and fork storage, with smaller frame bags that don't interfere with suspension movement.
For specific bike recommendations across all price ranges, see our guide to Best Bikepacking Bikes for Every Budget.
Frame Bags Deep Dive
Frame bags deserve careful consideration—they carry your heaviest items in the most handling-friendly position.
Full-Frame Bags
Full-frame bags maximize the space in your main triangle. When every liter counts—expedition riding, winter adventures, extended wilderness travel—filling the frame makes sense.
Capacity: 6-12 liters depending on frame size. Larger frames can accommodate impressively spacious bags; compact frames may only fit 4-5 liters even with a "full-frame" design.
The water bottle trade-off: Full-frame bags typically block seat tube and down tube bottle mounts. You'll need alternative hydration: stem-mounted bottles, hydration bladders, fork-mounted cages, or a combination. For rides with reliable water sources, this works fine. For desert or remote riding, plan hydration carefully.
Best for: Expedition riding, cold-weather trips requiring more gear, riders prioritizing capacity over convenience.
Half-Frame Bags
Half-frame bags occupy only the upper portion of the triangle, leaving space for at least one water bottle cage on the seat tube. This is the most popular configuration for most bikepackers.
Capacity: 3-6 liters typically. Enough for tools, food, electronics, and miscellaneous dense items.
Wedge vs. rectangular: Wedge designs taper toward the bottom bracket, maximizing space while avoiding pedal interference. Rectangular designs are simpler to manufacture but may not fit as neatly in the available space.
Best for: Most bikepackers. The balance of capacity and convenience works for overnighters through multi-week adventures.
Custom vs. Off-the-Shelf
Off-the-shelf bags use adjustable mounting systems to fit a range of frame sizes. They're more affordable, immediately available, and work well for most common frame geometries.
Custom bags are manufactured to your exact frame dimensions. A custom frame bag fills every available centimeter, maximizing capacity while ensuring perfect cable clearance and pedaling room. They cost more (typically $150-300 vs. $50-150 for off-the-shelf) and require 2-6 weeks for manufacturing.
When custom makes sense:
- Unusual frame geometry (very small frames, non-standard angles)
- You want absolutely maximum capacity
- You've been bikepacking enough to know exactly what you need
- Your off-the-shelf bag doesn't quite fit despite trying multiple options
Measuring your frame: If going custom, you'll need accurate measurements. Most custom bag makers provide templates—printable PDF guides that ensure precise measurements. Take your time; getting this wrong is expensive.
Saddle Bags Deep Dive
Saddle bags often carry the most volume of any single bag in your system. Getting this choice right matters.
Capacity Categories
Small (3-6 liters): Extended saddle pouches more than full bags. Great for day rides, racing, or as supplementary storage when a frame bag carries most of your gear.
Medium (8-12 liters): The sweet spot for most bikepackers. Fits a sleeping bag, lightweight shelter, and extra clothing layer. Handles three-season overnighters comfortably.
Large (14-20+ liters): Expedition scale. Fits winter sleeping systems, bulky shelters, extensive extra clothing. Necessary for cold-weather or extended wilderness travel. Can affect handling on technical terrain due to weight position.
Mounting Systems
Seatpost + saddle rail mounting: The most common approach. Straps wrap around your seatpost, with additional attachment points on the saddle rails. Secure when properly adjusted, though straps can slip over time. Check and re-tension periodically.
Proprietary quick-release: Some brands offer integrated mounting systems that lock to specific rail types or proprietary adapters. Faster to attach and remove, more secure, but ties you to that brand's ecosystem.
Harness + dry bag combos: A rigid harness attaches to your seatpost, accepting any appropriately sized dry bag. Maximum versatility—swap bag sizes based on trip length, use any replacement dry bag if yours fails, easily detach the bag at camp while leaving the harness mounted.
Stability Features
Saddle bag sway is the single most common complaint about bikepacking storage. When your bag swings side-to-side, it throws off your balance, wears mounting points, and makes technical riding miserable.
Internal stiffeners: Rigid panels or stays inside the bag maintain shape and prevent folding that leads to sway. Essential for larger bags.
Anti-sway baffles: Internal dividers that limit content movement. Paired with external compression straps, they keep everything locked in place.
Compression straps: External straps that tighten around the bag's contents. Critical for partial loads—a half-full bag without compression becomes a sway generator.
The test: Load your saddle bag, mount it, and shake your bike side-to-side. Any noticeable movement gets amplified on rough terrain. If it sways on a stationary test, fix it before riding.
Handlebar Bags Deep Dive
Handlebar bags complete the core three-bag system. They're also the most variable in design approach.
Harness + Dry Bag Systems
The dominant approach for serious bikepacking. A rigid harness straps to your handlebars, designed to accept standard dry bags.
Why it works:
- Any waterproof dry bag fits (typically 8-15 liters)
- Swap bag sizes based on trip requirements
- Grab the bag and go at camp—no unpacking required
- Replace a damaged bag easily
Considerations:
- Setting up the harness takes some adjustment
- Finding the right dry bag fit matters—too tight or too loose both cause problems
- Some harnesses creak or shift until properly dialed
For our top recommendations, see The 5 Best Bike Bags for Bikepacking.
Integrated Handlebar Bags
Some bags mount directly to handlebars without a separate harness, offering built-in organization and a cleaner look.
Advantages:
- Better internal organization with pockets and compartments
- Cleaner mounting with fewer straps
- Quick access to items without opening the main compartment
Trade-offs:
- Less capacity flexibility
- Harder to detach at camp
- If waterproofing fails, no easy fix
Handlebar Rolls
The simplest and most budget-friendly approach. A lightweight harness or set of straps, combined with any dry bag you have available.
Why consider it:
- Lowest cost entry point
- Minimal weight
- Works with dry bags you may already own
Limitations:
- Less secure than dedicated systems
- May shift on rough terrain
- Requires more fiddling to get right
For budget-conscious setups, our Budget Bikepacking: Complete Setup Under $500 guide covers affordable handlebar storage options.
Accessory Bags: Expanding Your System
Beyond the core three bags, accessory bags add capacity and improve access to frequently needed items.
Top Tube Bags and Feed Bags
Top tube bags mount on your top tube, just behind the stem. They're the most accessible storage position while riding—no need to stop for snacks, phone, or sunscreen.
Bolt-on vs. strap-on: Some frames include top tube mounting bolts. Bolt-on bags are more secure and eliminate strap wear on your frame. Strap-on designs work universally but add velcro or straps that can scratch paint over time.
Sizing: Typically 0.5-2 liters. Larger bags start interfering with thigh clearance on climbs. Measure the space between your stem and where your legs contact the frame when pedaling—that's your maximum length.
Feed bags mount on either side of your stem, creating cockpit storage. Originally designed for endurance racing nutrition, they work beautifully for bikepacking. Small items stay immediately accessible without opening any zippers—just reach in.
For recommendations, see our Top Tube Bags and Feed Bags for Easy Access guide.
Fork Bags and Cargo Cages
Your fork legs represent underutilized storage real estate. "Anything cages" mount to fork eyelets (or strapped on without eyelets), holding water bottles, dry bags, or specialized fork bags.
What they carry:
- Extra water bottles (critical for dry regions)
- Fuel canisters for cooking
- Small dry bags with camp items
- Specialized fork bags (typically 3-5 liters each)
Weight distribution benefits: Fork-mounted weight stays low and somewhat forward, creating excellent balance for climbing. Heavy water on your fork can actually improve handling compared to the same weight mounted high in a handlebar bag.
Considerations: Wide fork bags can affect tire clearance on tight turns. Test with your specific fork and tire combination before committing.
For specific options, see our Fork Bags and Cargo Cages: Expanding Your Capacity guide.
Stem Bags
Stem bags mount directly to your stem, creating a tiny pocket for immediate essentials. Perfect for phone, cash, snacks, or a small camera. Capacity runs 0.5-1 liters typically.
Less common than other accessory bags, but devotees swear by having that immediately accessible pocket without reaching for zippers or straps.
Packing Strategy and Weight Distribution
Owning the right bags is half the equation. Packing them properly determines whether your loaded bike handles well or fights you every mile.
The Golden Rules
Heavy items low and centered. Your frame bag should carry the densest items—tools, heavy food, electronics, batteries. This keeps weight close to your bike's center of gravity, minimizing handling impact.
Balance left-to-right. Pack consciously to maintain side-to-side balance. A heavy water bottle on one fork with nothing on the other creates noticeable handling asymmetry.
Frequently needed items accessible. Don't bury your rain jacket at the bottom of your saddle bag. Snacks belong in top tube bags, not deep inside your frame bag. Think through what you'll need while riding versus what you'll unpack at camp.
Waterproof the essentials. Even in a waterproof bag, protect critical items with additional waterproofing. Electronics in zip-locks, sleeping bag in a stuff sack inside the saddle bag. Redundancy prevents disaster.
What Goes Where
Frame bag: Tools, spare tubes, pump, multi-tool, heavy food, electronics, portable charger, valuables. The densest items in your kit belong here.
Saddle bag: Sleeping bag, tent or bivy, extra clothing, camp comfort items. Lightweight but bulky items that won't throw off handling.
Handlebar bag: Shelter (if not in saddle bag), puffy jacket, camp clothing, items you might need without fully stopping. Keep this relatively light—heavy handlebar bags affect steering.
Top tube bags: Snacks, phone, sunscreen, lip balm, small items needed while riding.
Fork bags: Extra water, fuel canisters, small dry bags with camp supplies. Heavy liquids work well here.
Common Packing Mistakes
Overloading the handlebar. Tempting because handlebar bags are large and accessible. But weight here affects steering more than any other position. Keep handlebar contents light relative to total load.
Unbalanced loading. One heavy water bottle on the left fork, nothing on the right. A lopsided frame bag. Heavy items on one side of your saddle bag. Small asymmetries compound into handling problems.
Poor compression. A half-full saddle bag without compression straps swings and shifts. Always compress partially full bags. Better to use a smaller bag properly compressed than a larger bag loosely packed.
For complete packing techniques, see our How to Pack Your Bikepacking Bags: Weight Distribution guide.
Waterproofing Your System
Rain happens. Streams need crossing. Your gear needs protection beyond hoping for good weather.
Bag Construction Types
Fully waterproof (welded seams): Premium bags use RF-welded or heat-welded seams with waterproof zippers or roll-top closures. True submersion protection—your gear stays dry even in heavy rain or stream crossings. Brands like Ortlieb set the standard here.
Water-resistant (coated fabric): Mid-range bags use waterproof-coated fabrics with taped seams and water-resistant zippers. They handle rain and splashes but eventually leak in sustained downpours or if submerged. Adequate for most conditions with backup protection.
Not waterproof (need liners): Budget bags often use basic nylon with minimal water protection. They'll wet through in any significant rain. Always use dry bag liners inside these bags.
Backup Protection
Even in waterproof bags, backup protection adds insurance and helps organization.
Dry bags inside bags: Stuff sacks or small dry bags for individual items. Your sleeping bag in its own waterproof stuff sack stays dry even if the saddle bag leaks.
Garbage bag liners: The budget waterproofing solution. A small garbage bag or contractor bag lines any frame bag or saddle bag cheaply. Inelegant but effective.
Stuff sacks for organization: Beyond waterproofing, stuff sacks help you find items quickly. Color-coded sacks—blue for rain gear, red for first aid, green for food—speed up packing and access.
Protecting Electronics
Electronics are particularly vulnerable. A wet phone or dead GPS can ruin a trip.
Waterproof cases: Small waterproof pouches for phones and electronics. Worth the minimal weight and bulk for peace of mind.
Redundant protection: Phone in a zip-lock, inside a waterproof pouch, inside the frame bag. Three layers of protection ensure critical electronics survive any conditions.
Quick-access while protected: Balance protection with accessibility. A clear waterproof phone pouch lets you check maps without exposing your phone to rain.
Budget Considerations
Bag systems range from under $100 to over $800. Understanding the tiers helps you spend wisely.
Budget-Friendly Options ($100-200 total)
A complete three-bag system for around $150 is genuinely possible. Brands like ROCKBROS, Rhinowalk, and other value-oriented manufacturers offer functional bags at accessible prices.
What you get: Functional waterproofing (usually water-resistant rather than truly waterproof), adequate mounting systems, reasonable durability for occasional use. Some compromises in mounting security and long-term durability.
What to prioritize: If budget is tight, invest more in the saddle bag—it carries the most volume and stability matters most there. Frame and handlebar bags can be simpler without major consequences.
Our Budget Bikepacking: Complete Setup Under $500 guide includes specific budget bag recommendations.
Mid-Range Sweet Spot ($250-450 total)
This tier offers the best value for committed bikepackers. Brands like Topeak, Blackburn, and Roswheel offer genuine quality without premium pricing.
What you get: Better waterproofing, more secure mounting systems, improved durability, thoughtful features like internal organization. These bags handle regular use for years.
Best for: Riders planning multiple trips per year who want reliability without overspending.
Premium Investment ($500+ total)
Premium bags from Ortlieb, Revelate Designs, Apidura, and similar makers represent the best available. Whether they're worth 3-4x the cost of mid-range options depends on your priorities.
What you get: Bombproof waterproofing, ultralight materials where it matters, refined mounting systems that stay secure on technical terrain, durability for years of hard use, excellent warranty support.
When it's worth it:
- You ride frequently in rain or challenging conditions
- Technical terrain is your primary environment
- Long-term durability matters more than upfront cost
- You've worn out mid-range bags and want to invest once
To understand what makes bags last, see our Bikepacking Bag Materials: What Makes a Bag Durable? guide.
FAQ
Do I need all three bag types?
Not necessarily. Start with a frame bag—it's the most versatile and affects handling least. Add a saddle bag for overnight capacity. Handlebar bags come last; many bikepackers find they only need them for multi-day trips or when saddle bag capacity isn't enough.
Will bikepacking bags fit my bike?
Most bags use adjustable straps designed for various frame sizes. However, measure before buying. Full-suspension mountain bikes, very small frames, and bikes with unusual geometry may have limited options. Frame bags particularly need careful sizing.
Custom bags vs. commercial—which should I choose?
Commercial off-the-shelf bags work for 90% of riders. Consider custom when: you have unusual frame geometry, you need absolutely maximum capacity, or you've tried multiple commercial options without finding a good fit. Custom costs more but fits perfectly. For those interested in making their own, see our DIY Bikepacking Bags: Are Homemade Bags Worth It? guide.
How much total capacity do I need?
- Day rides: 5-10 liters
- Overnighters: 20-30 liters
- Multi-day: 30-45 liters
- Expedition: 45-60+ liters
These are guidelines—ultralight packers use less, comfort-focused riders use more. Start smaller than you think; constraints encourage creative packing.
Can I use bikepacking bags for commuting?
Absolutely. A frame bag carries daily essentials beautifully. Saddle bags work for lunch and layers. The no-rack design means easy on/off when you want to ride unloaded. Many bikepackers use their bags year-round for commuting.
Your Bag System, Your Adventure
The right bag system enables adventures. The wrong one creates frustration, handling problems, and the constant feeling that you're fighting your equipment.
Start with the core three-bag system. Understand what each position does best. Pack heavy items low and centered, light but bulky items in your saddle bag, quick-access items up front. Test your loaded setup on easier terrain before committing to challenging routes.
As you gain experience, you'll develop preferences. Some riders love the simplicity of minimal setups; others appreciate maximum capacity for extended adventures. Your bag system will evolve with your riding style.
The key principles remain constant: keep weight low, maintain balance, protect what matters, and always test your setup before the adventure depends on it.
For specific product recommendations, see our guide to The 5 Best Bike Bags for Bikepacking. For complete gear guidance, return to the Complete Bikepacking Gear Guide.
Now stop reading and start packing. The routes are waiting.


