DIY Bikepacking Bags: Are Homemade Bags Worth It?
20+ years testing gear in Colorado backcountry
Make or Buy?
The DIY bikepacking bag question attracts a certain type of person. Maybe you want a custom fit for an unusual frame. Maybe you enjoy making things. Maybe you want to save money. Maybe you just want to see if you can.
The honest answer: DIY bags can be rewarding, but they're rarely easier or cheaper than buying quality commercial bags. Understanding the real trade-offs helps you decide whether DIY makes sense for your situation.
This guide covers the reality of making bikepacking bags—what it takes, when it's worth it, and how to approach it if you decide to try.
For commercial bag recommendations, see our Complete Bag Guide. For budget options, check our Budget Bikepacking Setup Under $500.
The Case For DIY
Custom Fit
The most compelling reason. Frame bags sized exactly for your frame geometry, saddle bags that clear your specific seatpost angle, handlebar bags that fit your particular cockpit setup.
When this matters:
- Unusual frame geometry
- Full suspension bikes with limited triangle space
- Non-standard handlebar configurations
- Very specific requirements no commercial bag meets
Skill Building
Sewing is a useful skill. Starting with bikepacking bags teaches techniques that transfer to other outdoor gear repair and creation.
You'll learn:
- Pattern making
- Working with technical fabrics
- Zipper installation
- Hardware attachment
- Seam sealing
Customization
Exactly the pockets you want, in the sizes you want, where you want them. No compromises on features.
Options you control:
- Pocket configuration and access
- Color and aesthetics
- Materials for each component
- Attachment system details
Understanding Your Gear
Making something teaches you how it works. You'll understand bag construction deeply, making you better at selecting, using, and repairing commercial bags.
Satisfaction
Some people simply enjoy making things. If you're in this category, no further justification needed.
The Case Against DIY
It's Not Cheaper
Common misconception demolished:
Materials cost:
- Quality fabric: $15-30/yard
- Zippers: $3-15 each
- Hardware (buckles, webbing): $10-30
- Thread, notions: $10-20
Single frame bag materials: $50-100+
Commercial frame bag: $80-200
The gap narrows when you factor in time, mistakes, and tool investment.
The real math:
- First bag: More expensive than commercial (learning curve, material waste)
- Third bag: Approaching commercial prices
- Ongoing: Marginal savings if you value your time at $0
Time Investment
Learning to sew: 10-20 hours minimum for competence
First bag project: 15-40 hours (including pattern making, mistakes, redos)
Experienced maker: 5-15 hours per bag
If your time has any value, commercial bags are usually more cost-effective.
Quality Concerns
Commercial bags benefit from:
- Refined patterns developed over many iterations
- Industrial sewing equipment
- Quality control processes
- Tested durability
Your first bags will likely have:
- Imperfect stitching
- Suboptimal patterns
- Weaker seams
- Questionable waterproofing
This improves with experience, but the learning curve is real.
Tool Requirements
Minimum setup:
- Sewing machine capable of heavy fabrics: $150-500
- Heavy-duty needles: $10
- Fabric scissors: $20-40
- Measuring/marking tools: $20-30
- Seam ripper (you'll need it): $5
Better setup adds:
- Walking foot attachment: $50-100
- Heavy-duty machine: $400-1500
- Grommet/eyelet tools: $20-50
- Heat sealing equipment: $50-200
Total startup: $200-1000+ for serious capability
Honest Assessment
DIY Probably Makes Sense If:
- You need truly custom geometry that no commercial bag offers
- You already sew and have equipment
- You enjoy making things as a hobby (time isn't "cost")
- You want to learn the skill for broader purposes
- You have unusual requirements (odd materials, specific features)
DIY Probably Doesn't Make Sense If:
- You want to save money (you won't, realistically)
- You need bags soon (learning takes time)
- You value consistency and reliability (commercial is safer)
- You don't enjoy crafting/making (it becomes a chore)
- Standard commercial options fit your needs
The Hybrid Approach
Some riders:
- Buy commercial bags for critical items (saddle bag, handlebar bag)
- Make simple accessories (feed bags, top tube bags)
- Start with easy projects before complex ones
This lets you learn without depending on DIY for essential gear.
Real DIY Success Stories
Here's what actually motivates people who stick with DIY:
The Perfect Fit: "My unusual 54cm frame had no commercial full-frame bag options. After three prototypes, I made a bag that fits every centimeter. No commercial bag came close. Total cost: $150 and 30 hours. Worth it? For me, absolutely."
The Repair Skill Payoff: "Making two bags taught me enough that I've since repaired 15+ bags for myself and friends. The skill transfer is real—I understand seams, waterproofing, and hardware now."
The Iteration Benefit: "My fifth frame bag has exactly the pockets I want, oriented exactly how I use them. Commercial bags average user preferences. Mine matches my specific habits."
The Hobby Value: "I make bags in winter when I'm not riding. Beats watching TV, and I emerge from winter with new gear. The process is the point."
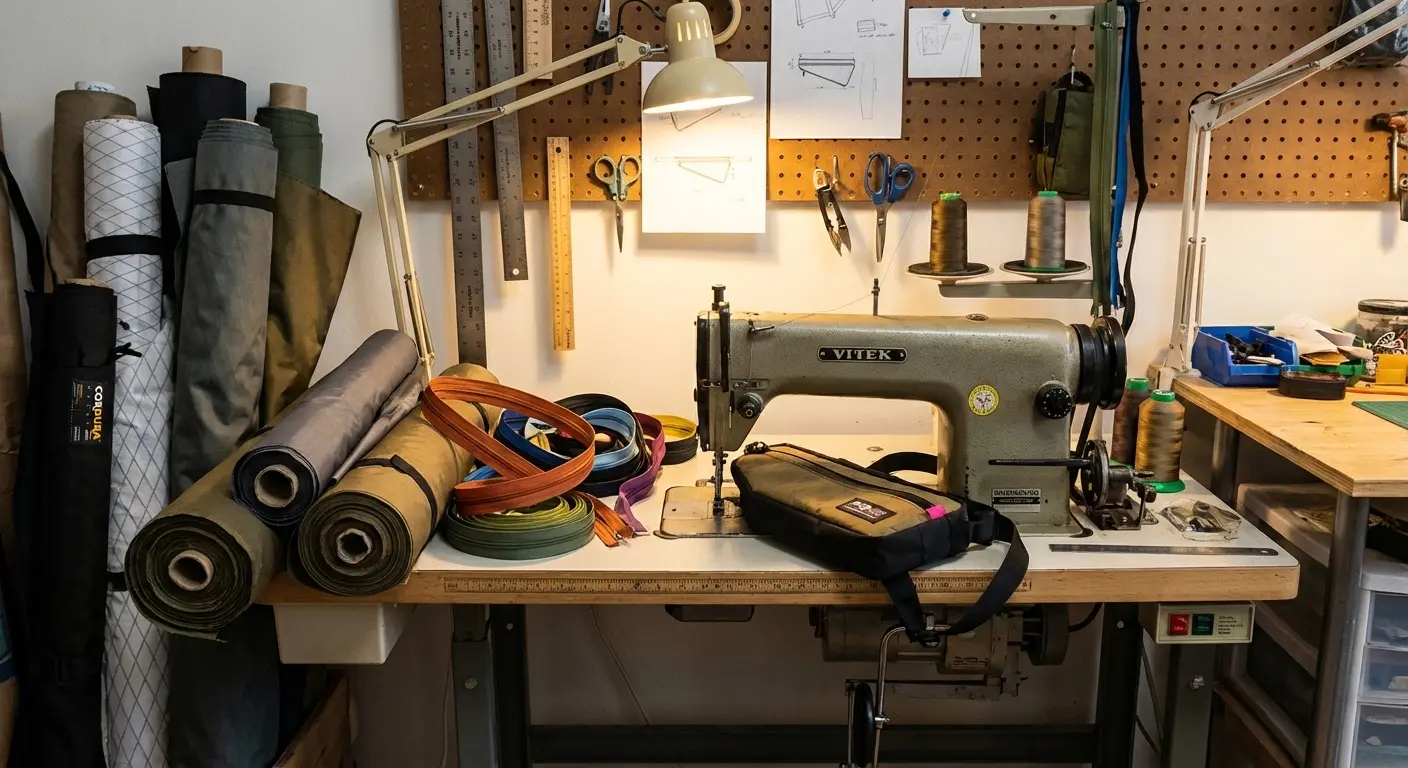
Getting Started
First Projects (Easier)
Simple stuff sacks: Rectangular bag with drawstring closure. Minimal skills, useful result.
Top tube bag: Small, flat, simple geometry. Good second project.
Frame strap bag: Small pouch with straps. Forgiving of mistakes.
Feed bag: Small, simple pocket. Functional quickly.
Intermediate Projects
Handlebar roll bag: More complex cylinder shape, but established patterns available.
Half-frame bag: Triangular, but simpler than full frame.
Advanced Projects
Full custom frame bag: Complex geometry matching your specific frame. Requires pattern making skills.
Roll-top saddle bag: Multiple attachment points, complex closure systems.
Handlebar harness systems: Integration of multiple components.
Essential Skills
Pattern Making
Creating templates that become your bag. Critical skill that determines fit and function.
Learn to:
- Measure and template odd shapes
- Add seam allowances consistently
- Account for fabric behavior
- Test patterns before cutting good materials
Resources:
- r/myog (Make Your Own Gear) subreddit
- YouTube pattern tutorials
- Commercial patterns for starting points
Sewing Basics
Critical techniques:
- Straight seams (sounds simple, requires practice)
- Corners and curves
- Zipper installation (harder than it looks)
- Bartacking (reinforcement stitching)
- Webbing and strap attachment
Practice on:
- Scrap fabric first, always
- Cheap materials before expensive ones
- Simple projects before complex
Working with Technical Fabrics
Different from regular sewing:
- Slippery fabrics require careful handling
- Coated fabrics can gum up needles
- Some fabrics don't pin well (use clips)
- Seam sealing adds steps
Materials Overview
For detailed information, see our Bag Materials Guide.
Fabrics
Beginner-friendly:
- 500D Cordura (forgiving, durable)
- Pack cloth (easy to work with)
- Basic ripstop nylon
Advanced:
- X-Pac (requires careful handling)
- Dyneema (expensive, unforgiving)
- Laminated fabrics
Hardware
Common needs:
- Plastic buckles (side-release and ladder locks)
- D-rings and tri-glides
- Zipper by the yard (YKK #5 coil)
- Webbing (various widths)
- Velcro
Where to buy:
- Ripstop By The Roll - Best selection of technical fabrics
- Seattle Fabrics - Hardware and specialty materials
- Quest Outfitters - Full range of DIY supplies
- Amazon (for basics like YKK zippers and webbing)
- Local fabric stores (limited selection)
Thread
Use: Heavy-duty polyester (Gutermann, Coats)
Avoid: Cotton thread (rots), cheap thread (breaks)
Weight: 69 or stronger for structural seams
Common Mistakes
Pattern Errors
Problem: Bag doesn't fit frame after construction.
Prevention: Make test pattern from cheap fabric or paper first. Mount template on bike before cutting good materials.
Seam Failures
Problem: Seams separate under load.
Prevention: Bartack stress points. Use appropriate thread. Don't rush critical seams.
Poor Waterproofing
Problem: Bag leaks despite "waterproof" materials.
Prevention: Seal all seams. Use waterproof zippers or protected zipper placement. Test before depending on it.
Overcomplicated Designs
Problem: First project has too many features, becomes overwhelming.
Prevention: Start simple. Add features to later projects as skills develop.
Wrong Materials
Problem: Fabric too light, too heavy, or wrong properties.
Prevention: Research before buying. Ask experienced makers. Start with proven material combinations.
Resources
Communities
r/myog (Reddit): Active community, pattern sharing, troubleshooting help
BIKEPACKING.com forums: Specific bikepacking bag discussions
MTBR forums: Mountain bike gear making discussions
Patterns
Porcelain Rocket: Commercial patterns for bikepacking bags (paid, high quality)
Free patterns: Various forum posts and blog articles (search myog + specific bag type)
Commercial bags as templates: Study construction before creating your own patterns
Learning
YouTube: Search "sewing [specific bag type]" for technique videos
Online courses: Sailrite, Craftsy offer relevant skills
Local: Some outdoor gear shops offer MYOG workshops
A Realistic First Project
Top Tube Bag
Why it works:
- Simple rectangular-ish shape
- Forgiving of small errors
- Immediately useful
- Low risk if it fails
- Good skill introduction
Basic approach:
- Template the space on your top tube
- Add 1/2" seam allowance to all sides
- Cut two main panels, one strip for sides/bottom
- Sew simple zipper across top
- Attach side strip
- Add webbing straps with velcro closure
Materials (approximate $20-30):
- 1/2 yard 500D Cordura
- 12" YKK zipper
- 1 yard 1" webbing
- 6" velcro
- Heavy thread
Time: 4-8 hours for first attempt
The Verdict
DIY bikepacking bags make sense for specific situations—truly custom geometry, hobby enjoyment, skill building, unusual requirements. They don't make sense as a money-saving strategy or quick alternative to commercial bags.
If you're curious, start small. Make a simple top tube bag or stuff sack. See if you enjoy the process. If you do, keep going. If you don't, commercial bags are excellent and reasonably priced.
For commercial bag recommendations, see our Complete Bag Guide, Frame Bags, Saddle Bags, and Handlebar Packs.
Make what makes sense. Buy what doesn't. Ride regardless.
FAQ
How much can I really save making my own bags?
Honestly? Probably nothing on early projects, and minimal ongoing. Material costs approach commercial bag prices. Your time has value. DIY savings are mostly mythical unless you already have equipment and skills.
What's the minimum sewing skill needed?
Basic straight-line sewing competence. If you can follow a pattern and sew a straight seam, you can learn bikepacking bag construction. Zippers and corners require practice.
Can I make waterproof bags?
Yes, with proper techniques: seam taping/sealing, waterproof zippers or protected placement, and appropriate fabrics. But achieving commercial-quality waterproofing takes experience.
How long until I make good bags?
Most makers report bags 3-5+ show significant improvement. Your first bag will work; it won't be pretty. Quality builds with each project.
Should I start with a kit?
Kits exist for some projects and can simplify material selection. They're a reasonable starting point if you find one for your target project.


