Budget Bikepacking: Complete Setup Under $500
20+ years testing gear in Colorado backcountry
You Don't Need Thousands to Start
The internet will tell you bikepacking requires a $3,000 bike, $500 in bags, and another $1,000 in ultralight camping gear. The internet is wrong.
Will this budget get you the lightest gear? No. The most durable? Probably not. The most Instagram-worthy? Definitely not. But it will get you functional equipment that works for real bikepacking trips. Equipment that lets you test this hobby before investing thousands. Equipment that proves expensive gear isn't the barrier—just starting is.
This guide breaks down exactly how to allocate $500 across every category. We'll cover specific products at specific prices, with alternatives where they make sense. By the end, you'll have a complete shopping list that gets you on the trail this weekend.
The only assumption: you already have a rideable bike. Almost any bike works for bikepacking—see our guide to convert any bike for bikepacking. If yours has working brakes, functioning gears, and can fit at least one frame bag, you're set.
Let's build your budget kit.
The $500 Budget Breakdown
Here's how we'll allocate your $500:
| Category | Budget | Purpose |
|---|---|---|
| Bags | ~$150 | Carry your gear |
| Shelter | ~$100 | Keep you dry |
| Sleep System | ~$120 | Keep you warm and rested |
| Clothing & Accessories | ~$80 | Layer and illuminate |
| Tools & Safety | ~$50 | Fix problems, stay safe |
| Total | ~$500 | Complete setup |
Some categories have wiggle room. If you already own hiking gear, reallocate that budget elsewhere. If you find deals, pocket the savings or upgrade weak spots. The goal is a functional baseline that handles three-season overnighters without breaking.
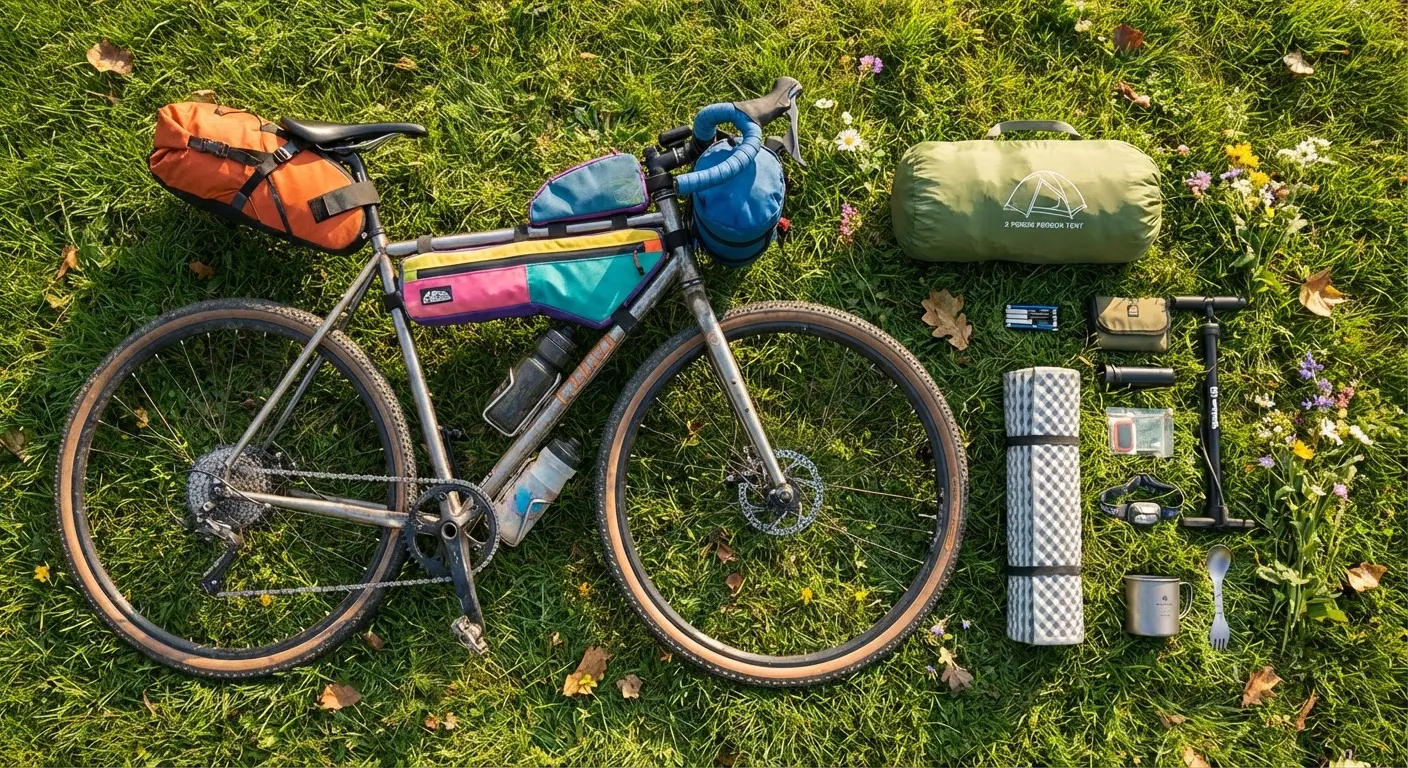
Bags: The Foundation (~$150)
Bags turn a regular bike into a bikepacking rig. You need capacity for shelter, sleep system, clothing, food, and tools—distributed across frame, saddle, and handlebars. For complete bag guidance, see our Complete Bikepacking Bag Storage Guide. Premium bags cost $100+ each. Budget bags deliver 80% of the function at 30% of the price.
Frame Bag
Your frame bag carries heavy, dense items: tools, food, water, electronics. Weight here affects handling least because it sits low and centered.
ROCKBROS Waterproof Triangle Frame Bag (4L)
ROCKBROS delivers remarkable value in frame bags. The 4L capacity handles tools, snacks, and daily essentials with room to spare. Dual-side zipper access means you can reach contents from either side of the bike without awkward fumbling. The water-resistant construction handles splashes and light rain—not submersion, but adequate for real conditions. Mounting uses adjustable straps that fit most frame geometries. At this price, you'd expect compromises. The main one: the zippers aren't fully waterproof. Line with a plastic bag for wet conditions. Otherwise, this bag punches far above its price class.
- 4L capacity fits most frames
- Dual-side zipper access
- Water-resistant 840D nylon
- Adjustable strap mounting
- Internal organization pockets
Saddle Bag
Saddle bags carry bulky, lightweight items: sleeping bag, extra clothing, anything compressible. Expandable designs maximize versatility.
ROCKBROS Waterproof Saddle Bag (3-10L Expandable)
The expandable design makes this bag remarkably versatile. Rolled down, it holds just 3L—enough for day rides or ultralight overnighters. Fully extended, it swallows 10L of gear—sleeping bag, puffy jacket, spare clothing, and more. The roll-top closure provides genuine waterproofing, not just water resistance. Mounting uses two seatpost straps plus saddle rail attachment for stability on rough terrain. Internal stiffeners prevent the dreaded side-to-side sway that plagues cheap seat packs. Will it last a decade of hard use? Unknown. Will it handle your first several seasons of bikepacking while you figure out your preferences? Absolutely.
- 3-10L expandable capacity
- Roll-top waterproof closure
- Dual seatpost + saddle rail mount
- Internal stiffeners reduce sway
- Reflective accents for visibility
Handlebar Bag
Handlebar bags provide quick access to items you need while riding: rain jacket, snacks, phone. Two approaches work at budget prices.
DIY Option (~$25): A waterproof dry bag plus Voile straps creates a functional handlebar setup for minimal cost. The 10L Sea to Summit or similar dry bag straps directly to handlebars. It's not elegant, but it works—and experienced bikepackers often prefer this simplicity over complex harness systems.
Dedicated Bag Option:
ROCKBROS Waterproof Handlebar Bag
If you prefer a purpose-built solution, ROCKBROS offers a handlebar bag with built-in mounting that eliminates strap fiddling. The waterproof construction keeps contents dry. Capacity suits quick-access items—not full overnight gear, but perfect for rain layers, current snacks, and electronics. The rigid structure maintains shape when partially loaded, unlike stuff-sack approaches. Quick-release buckles allow fast removal at camp. For budget setups, this adds convenience worth the modest premium over DIY approaches.
- Waterproof construction
- Built-in mounting system
- Quick-release buckles
- Maintains shape when loaded
- Reflective elements
Top Tube Bag
A small top tube bag provides instant snack access without stopping—crucial for maintaining energy on long days.
ROCKBROS Top Tube Bag
The cheapest useful addition to any bikepacking setup. This small bag mounts on your top tube for grab-and-go access to snacks, phone, or small items. The zipper stays accessible while riding. Water-resistant fabric handles sweat and light rain. It won't transform your bikepacking experience, but at this price, the convenience is essentially free. Upgrade later if you want touchscreen compatibility or larger capacity—this handles the basics.
- Easy snack access while riding
- Water-resistant fabric
- Low-profile design
- Secure zipper closure
- Universal top tube fit
Bag Total: ~$120-150 depending on handlebar approach
For riders with sewing skills or extra time, making your own bags can stretch this budget even further—see our DIY Bikepacking Bags: Are Homemade Bags Worth It? guide.
Shelter: Staying Dry (~$100)
Shelter protects you from rain, wind, bugs, and morning dew. Budget options exist, though this category offers less room for compromise than bags. A failed shelter means a miserable night. For more options, see our guide to the best one-person tents.
Naturehike Cloud Up 1 Ultralight Tent
The Cloud Up 1 defies its price point. At under 3 pounds packed, it approaches weights that cost triple elsewhere. The double-wall design separates breathable inner from waterproof outer, managing condensation better than single-wall alternatives. The aluminum poles handle wind. The silnylon fly sheds rain. Setup takes minutes with practice. Floor space fits one person plus gear vestibule. Is it as refined as premium ultralight tents? No—zippers feel less smooth, seams require occasional re-sealing, and packed size is larger. But for budget bikepackers, this tent delivers genuine performance at an accessible price. Thousands of bikepackers have used Cloud Up tents for serious adventures. They work.
- Under 3 lb packed weight
- Double-wall design reduces condensation
- Freestanding with aluminum poles
- Vestibule for gear storage
- Silnylon fly for waterproofing
Alternative Approach: Tarp + Bivy (~$60-80)
For adventurous beginners comfortable with simpler shelter, a tarp and bivy combination saves weight and money. A basic tarp ($30-40) plus emergency bivy ($20-30) provides adequate protection in fair conditions. This approach requires more skill to pitch effectively and offers less protection in storms, but some bikepackers prefer the simplicity and weight savings.
Shelter Total: ~$100
Sleep System: Rest That Restores (~$120)
Sleep quality determines trip enjoyment more than almost any other factor. Skimp here and you'll drag through day two exhausted and miserable. The sleep system—bag plus pad—deserves careful attention even on a budget. For upgrade options, see our guides to best sleeping bags and best sleeping pads.
Sleeping Bag
Temperature rating matters most. A bag rated too warm leaves you shivering; one rated too cold adds unnecessary weight. For three-season bikepacking, target 20-30°F rated bags.
Kelty Cosmic 20 Sleeping Bag
Kelty has produced budget-friendly sleeping bags for decades. The Cosmic 20 represents their refined understanding of what budget buyers actually need. The 20°F rating handles cold spring and fall nights—you'll sleep comfortably down to about 30-35°F, with survival rating below that. Synthetic insulation maintains warmth even when damp, forgiving the moisture issues that plague budget gear. The mummy shape minimizes weight while maximizing thermal efficiency. A draft collar and hood seal in warmth. Packed size is larger than premium down bags but manageable for bikepacking. This bag has proven itself on countless budget adventures.
- 20°F temperature rating
- Synthetic insulation (works when damp)
- Mummy shape for efficiency
- Draft collar and hood
- Proven durability
Sleeping Pad
Your pad provides cushioning and crucial insulation from the ground. R-value measures insulation—higher numbers mean more warmth. For three-season use, target R-3 or higher.
Klymit Static V Sleeping Pad
Klymit's V-chamber design revolutionized budget sleeping pads. The unique pattern limits air movement, providing surprising insulation and stability for the price. Side rails keep you centered—no rolling off in the night. At R-1.3, it handles summer conditions excellently; pair with a foam pad for colder nights. Inflating takes about 10-15 breaths. The valve allows fine-tuning firmness. Packed size is reasonable for bikepacking, though not ultralight. Durability has proven excellent across thousands of trail nights. For pure summer bikepacking, this is the budget pad to beat. For shoulder seasons, consider adding a 1/8 inch foam pad underneath for combined R-value boost.
- V-chamber design for stability
- Side rails prevent rolling
- 10-15 breaths to inflate
- Reasonable packed size
- Proven durability
Sleep System Total: ~$120
Clothing & Accessories (~$80)
Clothing for bikepacking divides into riding gear (what you wear on the bike) and camp gear (what you change into when riding stops). The budget approach: minimal camp clothing, maximum versatility.
Rain Protection
Rain finds you eventually. A packable rain jacket protects your core without breaking the budget.
Frogg Toggs Ultra-Lite2 Rain Jacket
Frogg Toggs has earned cult status among budget outdoor enthusiasts. The Ultra-Lite2 weighs almost nothing, packs smaller than a soda can, and costs less than lunch. Is it breathable? Barely. Will it last forever? No—treat it gently. But it's fully waterproof and handles rain better than being wet. For budget bikepackers, this jacket provides genuine rain protection at a price that's almost free. When you're ready to upgrade, spend more on a breathable shell. Until then, this works.
- Extremely lightweight
- Fully waterproof
- Packs tiny
- Remarkably affordable
- Adjustable hood
Headlamp
Essential for camp tasks and emergency night riding. Budget headlamps work fine—you don't need 1000 lumens for finding your tent zipper.
Budget Pick: Any basic LED headlamp ($10-20) with at least 100 lumens, red light mode, and AAA batteries. Petzl Tikkina, Black Diamond Spot, or Amazon Basics all work. Rechargeable headlamps offer convenience but require power management.
Base Layer & Accessories
Allocate remaining budget (~$30-40) across:
- Synthetic or budget merino base layer top for camp warmth
- Warm hat (critical for cold nights)
- Lightweight gloves (cycling or liner weight)
- Buff or neck gaiter (versatile temperature regulation)
Avoid cotton entirely. Synthetic fabrics dry quickly and maintain warmth when damp—essential for multi-day trips.
Clothing & Accessories Total: ~$60-80
Tools & Safety (~$50)
Mechanical problems happen. Basic preparedness means you can fix common issues trailside instead of walking.
Multi-Tool
A quality multi-tool handles most bikepacking repairs. Look for hex keys, Torx keys, screwdrivers, and a chain breaker.
For detailed multi-tool recommendations, see our guide to The One Multi-Tool You Need.
Budget Option (~$20-25): The Crankbrothers M19 or similar budget multi-tool includes all essential functions. Premium tools offer better ergonomics and durability, but budget options handle occasional use. For building a complete repair kit as your budget allows, see our Building Your Bikepacking Tool Kit guide. For maintenance skills that will save you money long-term, check our Complete Bikepacking Maintenance Guide.
Tire Repair
Flat tires are the most common mechanical. See what bikepackers use to patch tires for detailed guidance. Carry:
- Spare tube (~$8) - matched to your tire size
- Patch kit (~$5) - for multiple flats
- Tire levers (~$5) - plastic, lightweight
- Mini pump (~$15-20) - or CO2 inflator (see our pumps guide)
First Aid & Misc
Basic supplies for minor injuries (see our first aid kit guide for complete recommendations):
- Adhesive bandages (various sizes)
- Medical tape
- Pain relievers (ibuprofen)
- Personal medications
A small stuff sack organizes everything. Total first aid cost: ~$10 from a pharmacy.
Tools & Safety Total: ~$50
What You're Not Getting
Honesty matters. This $500 budget delivers functional gear, not premium gear. Here's what you sacrifice:
Ultralight Weight: Budget gear weighs more. Your complete setup might hit 12-15 pounds where ultralight builds achieve 6-8. This matters less than Instagram suggests—people bikepacked for decades before gram counting became fashionable.
Premium Materials: You're getting nylon, not Dyneema. Polyester, not merino. The gear works; it's just not boutique.
Long-term Durability: Some budget items won't survive years of hard use. The bags might last three seasons instead of ten. The tent zippers might stick eventually. Consider it rental cost for learning your preferences before investing more.
Aesthetic Perfection: Budget gear looks budget. Colors clash, logos proliferate, and nothing matches. If Instagram aesthetics matter, expect compromise.
What You ARE Getting: Functional equipment that handles real bikepacking trips. Gear that lets you test this hobby before committing thousands. Proof that expensive equipment isn't the barrier—just starting is.
What Budget Gear Actually Teaches You
Here's the hidden value of starting cheap: budget gear teaches you faster than premium gear.
You learn your preferences: After two trips with a budget saddle bag, you'll know exactly what features you want in an upgrade—stabilizer straps, waterproof fabric, specific capacity. Premium buyers guess; budget graduates know.
You discover what matters: Many bikepackers upgrade their sleep system after one cold night—and never upgrade their bags because the budget ones work fine. Experience reveals your actual priorities.
You're not precious about your gear: Budget gear gets used without hesitation. You'll try things, make mistakes, and learn without worrying about damaging expensive equipment.
You build confidence: Completing a trip on budget gear proves the adventure is about you, not your equipment. That mindset serves you better than any gear upgrade.
Upgrade Path
As budget allows, prioritize upgrades in this order:
1. Sleep System (First Priority)
Sleep quality affects everything. Upgrade your sleeping bag to down insulation for better warmth-to-weight. Upgrade your pad to higher R-value for shoulder-season comfort. These improvements pay dividends every single night.
2. Bags (Second Priority)
Premium bags offer better materials, longer durability, and refined features. A quality seat pack with proper stiffeners transforms rough-road handling. A custom-fit frame bag maximizes your triangle space.
3. Shelter (Third Priority)
Once you know your shelter preferences, invest in lighter weight or better weather protection. Ultralight tents drop pounds from your setup. Four-season options extend your riding season.
4. Clothing & Accessories
Breathable rain gear, quality base layers, and proper cycling-specific clothing improve riding comfort. These upgrades are nice, not essential—many bikepackers use budget clothing for years.
FAQ
Can I really start for under $500?
Yes, with the specific products listed above. Prices fluctuate, and sales can push the total even lower. The math works.
What if I already have camping gear?
Reallocate that budget elsewhere. If you own a backpacking tent, skip the shelter purchase and upgrade bags or sleep system. If you have a sleeping bag, invest more in quality bags.
Should I buy used?
Absolutely. Used bikepacking gear often sells for 40-60% of retail. Check local classifieds, bikepacking forums, and Facebook groups. Many bikepackers upgrade frequently, selling lightly-used budget gear cheap. Just verify functionality before purchasing.
What's the first upgrade I should make?
Sleep system, almost always. Bag and pad upgrades improve every single night. Everything else improves certain situations—sleep quality affects the entire experience.
Will this budget gear handle multi-day trips?
Yes, with care. The limiting factor is usually you, not your gear. Budget equipment handles weekend trips without issue. Week-long adventures require more attention to durability—but they're definitely achievable.
Start Riding
Five hundred dollars. That's it. The complete cost of entry to a hobby that offers lifetime adventure.
Stop waiting for the perfect setup. Stop researching ultralight options you can't afford. Stop believing that expensive gear is required for genuine experiences.
Buy the budget gear. Pack the bike you own. Plan a short overnighter close to home. Learn what works and what doesn't through actual experience—not internet speculation.
For comprehensive gear education, see our Complete Bikepacking Gear Guide. For first-trip planning, read Bikepacking for Beginners.
Then close the laptop and go ride.
The trails are waiting, and $500 is all it costs to find them.


