Complete Bikepacking Maintenance Guide: Keep Your Bike Running Anywhere
20+ years testing gear in Colorado backcountry
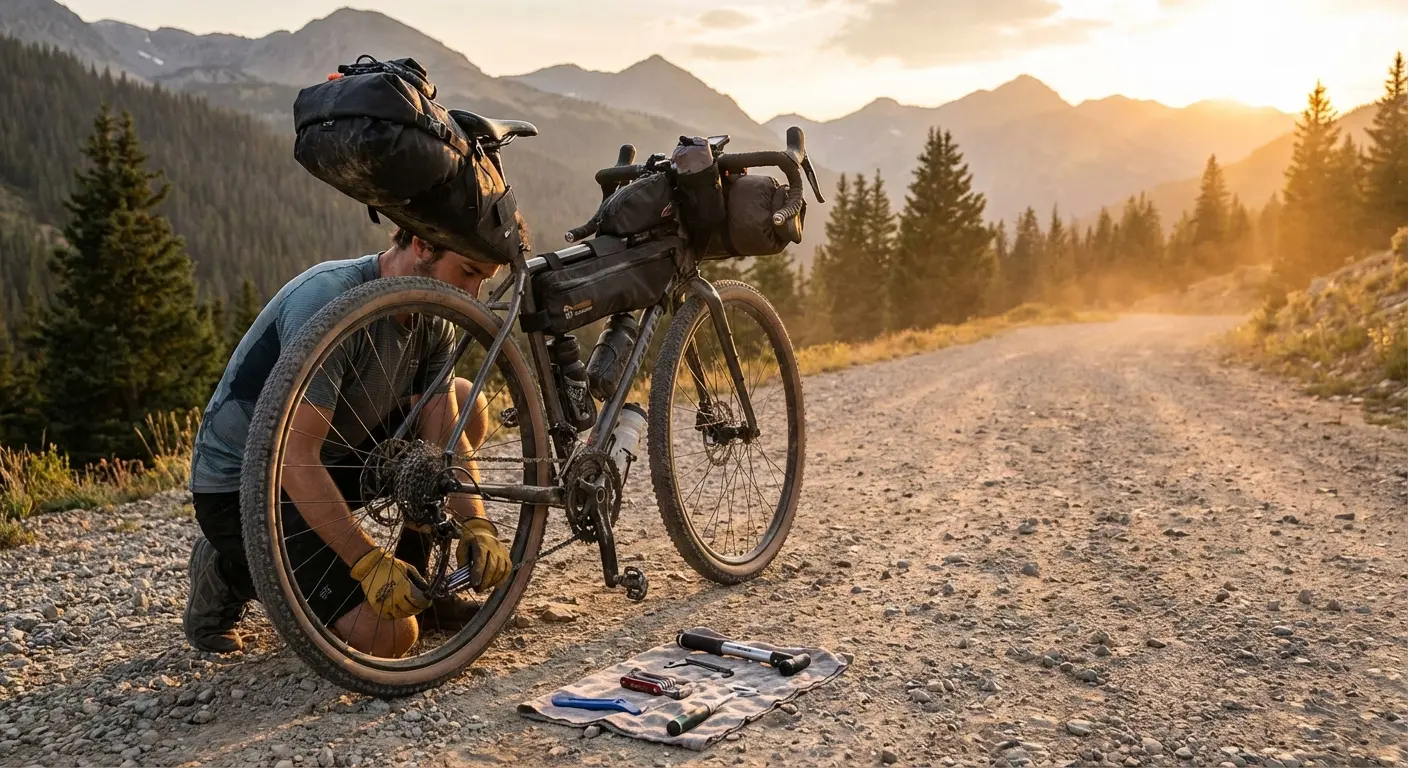
Self-Sufficiency Starts with Your Wrench
The difference between a bikepacking trip and a bikepacking disaster often comes down to a few basic maintenance skills and the right tools to execute them.
Fifty miles from the nearest bike shop, your chain starts skipping. Your brakes feel spongy. That clicking sound you ignored at home now seems ominous. In bikepacking, mechanical problems don't wait for convenient timing—and neither should your preparation.
This guide covers everything you need to maintain your bike before, during, and after bikepacking trips. Whether you're planning a weekend overnighter or a multi-week expedition, these skills and knowledge will keep you rolling when problems arise.
For specific repair scenarios, see our guides on chain maintenance, disc brake care, and tubeless tire maintenance. For tool selection, check our multi-tool guide and building your tool kit.
Pre-Trip Inspection Checklist
The ABC Quick Check
Before every ride—whether around the block or across the state—run through the ABC Quick Check:
A - Air:
- Tires inflated to appropriate pressure
- No visible damage, cracks, or embedded debris
- Valve stems straight and functional
- Tubeless sealant topped up (check by shaking wheel)
B - Brakes:
- Levers engage before touching handlebars
- Pads have adequate material (>1mm)
- Rotors aren't warped (spin wheel, check for rubbing)
- No contamination on pads or rotors
C - Chain and Cranks:
- Chain clean and lubricated
- No stiff links or visible damage
- Crank bolts tight
- Chainring teeth not worn or shark-finned
Full Pre-Trip Inspection
For multi-day trips, go deeper:
| System | Check | What to Look For |
|---|---|---|
| Wheels | Spoke tension | Loose or broken spokes, trueness within 2mm |
| Hubs | Play and roughness | Side-to-side wobble, grinding when spun |
| Headset | Play and smoothness | Rocking when brakes applied, indexed turning |
| Bottom Bracket | Play and noise | Side-to-side crank wobble, clicking under load |
| Derailleur | Alignment and limits | Hanger straightness, full shift range |
| Cables/Housing | Fraying and stiffness | Kinked housing, exposed inner wires |
| Bolts | Torque | All critical bolts checked to spec |
| Bags | Attachment | Secure mounting, no rubbing |
For a detailed inspection walkthrough, see our Pre-Trip Bike Inspection Checklist.
Essential Trail Repair Skills
Not every repair requires a shop. Master these skills and you'll handle 90% of trailside issues:
Skill 1: Fixing a Flat
Whether you run tubes or tubeless, flat tires are the most common bikepacking mechanical.
For tubed tires:
- Remove wheel and unseat tire with levers
- Remove tube and locate puncture
- Patch with vulcanizing or glueless patch
- Check tire interior for debris before reinstalling
- Partially inflate, seat tire, fully inflate
For tubeless tires:
- Try spinning the wheel to let sealant find the hole
- If sealant fails, use a tire plug
- For large punctures, install a tube
- Always carry a backup tube for emergencies
See our complete tire patching guide for detailed instructions.
Skill 2: Chain Repair
A broken chain ends your ride—unless you know how to fix it.
- Remove damaged links using your chain tool's pin pusher
- Rejoin with a quick link (master link) sized for your chain
- Or use the chain tool to press the pin back through
- Check the repair by flexing the link—it should move freely
Always carry at least two quick links matching your chain (8/9/10/11/12-speed specific). Our chain maintenance guide covers this in depth.
Skill 3: Derailleur Adjustment
Shifting problems on trail are frustrating but usually fixable:
For poor shifting:
- Check cable tension—usually it's too loose
- Turn barrel adjuster counterclockwise to add tension
- Shift through gears to verify improvement
For chain dropping:
- Adjust limit screws (H for high/small cog, L for low/large cog)
- High limit: prevents chain from overshooting smallest cog
- Low limit: prevents chain from going into spokes
See our derailleur adjustment guide for the complete process.
Skill 4: Brake Adjustment
Spongy or grabby brakes compromise safety:
For disc brakes rubbing:
- Loosen caliper bolts slightly
- Squeeze lever to center caliper on rotor
- Tighten bolts while holding lever
- Spin wheel to verify no rubbing
For weak braking:
- Check pad wear—replace if less than 1mm material
- Clean contaminated pads with isopropyl alcohol
- Realign caliper if dragging
Full details in our disc brake maintenance guide.
Skill 5: Emergency Wheel Truing
A significantly out-of-true wheel rubs brakes and affects handling:
- Identify the wobble direction (left or right)
- Find which spokes to tighten/loosen
- Work in small increments (¼ turn)
- True against brake pads as a reference
- Get it rideable, not perfect—save precision for home
See our wheel truing guide for complete instructions.
Drivetrain Care: Chain, Cassette, Chainrings
Your drivetrain does the hardest work. Keep it running smoothly and it'll last thousands of miles. Neglect it and you'll replace expensive components prematurely.
Chain: The Most Important Component
Chain wear measurement:
- Use a chain checker tool for accuracy
- Replace at 0.5% wear (some say 0.75% is acceptable)
- Check every 500-1000 miles, more in gritty conditions
- New chains on worn cassettes may skip—consider replacing together
Chain cleaning:
- Quick clean: Wipe with rag, relube
- Deep clean: Use chain cleaning device or remove and soak in degreaser
- Never use WD-40 alone—it's a solvent, not a lubricant
- Always relube after cleaning
Chain lubrication:
- Wet lube: Best for wet conditions, attracts more dirt
- Dry lube: Best for dry/dusty conditions, needs more frequent application
- Apply to inside of chain, spin cranks, wipe excess
- Too much lube attracts grit; too little accelerates wear
Cassette Care
Cleaning:
- Use a brush and degreaser between cogs
- A dedicated cassette brush reaches everywhere
- Clean whenever you deep-clean your chain
Wear indicators:
- Shark-finned teeth (hooked shape)
- Chain skipping under power, especially in favorite gears
- Usually wears with chain—replace together if worn
Chainring Care
Cleaning:
- Same process as cassette—brush and degreaser
- Check teeth for wear (shark fins)
- Gravel and single-ring setups concentrate wear on one ring
Maintenance:
- Chainring bolts can loosen—check torque periodically
- Replace when teeth become noticeably hooked
Brake Systems: Disc Brake Basics
Modern bikepacking bikes almost universally use disc brakes. Understanding basic maintenance keeps you stopping safely.
Pad Inspection and Replacement
When to check:
- Before every multi-day trip
- After wet or gritty rides
- When braking feels or sounds different
What to look for:
- Minimum 1mm pad material remaining
- Even wear across pad surface
- No contamination (oil, grease, bike wash)
Replacing pads on trail:
- Remove wheel
- Carefully pry out old pads (note orientation)
- Insert new pads (correct direction matters)
- Reinstall wheel, squeeze lever to seat pads
- Bed in by doing several moderate stops
Rotor Alignment
Symptoms of misalignment:
- Rubbing sound when spinning wheel
- Pulsing brake feel
- Reduced braking power
Trail fix:
- Loosen caliper mounting bolts slightly
- Hold brake lever firmly
- Retighten bolts while lever is engaged
- Release lever and check for rubbing
Rotor truing:
- For minor warps, use a rotor truing tool
- Or carefully bend with clean hands (don't touch braking surface)
- Work in small increments
Contamination Issues
Prevention:
- Never spray lubricants near brakes
- Cover rotors and calipers when washing bike
- Don't touch rotor braking surfaces
If contamination happens:
- Try scrubbing pads with isopropyl alcohol and sanding
- Sand rotor surface with fine grit
- Often requires new pads for safety
See our complete disc brake maintenance guide for detailed procedures.
Wheel Care and Emergency Truing
Wheels take tremendous abuse in bikepacking. Pot holes, rocks, loaded weight, and hard riding all stress spokes and rims.
Spoke Tension Basics
Why it matters:
- Even tension distributes load across all spokes
- Uneven tension causes wobbles and accelerates failures
- Loose spokes work themselves looser; tight spokes stress neighbors
Checking tension:
- Pluck spokes like guitar strings—they should sound similar
- Noticeably lower-pitched spokes need tightening
- Professional tension meters exist, but ear works for field assessment
Emergency Truing Without a Stand
You won't have a truing stand on trail. Use what you have:
Using brake pads as reference:
- Flip bike upside down or lift wheel off ground
- Spin wheel slowly, watch gap between pad and rim
- Mark where rim moves toward pad (tight spot)
- Tighten spokes on opposite side of wobble
- Loosen spokes on same side of wobble
- Work in ¼ turn increments
- Aim for rideable, not perfect
Using zip tie on fork/frame:
- Attach zip tie pointing at rim sidewall
- Adjust until it nearly touches rim
- Use as reference while truing
Broken Spoke Repair
If a spoke breaks:
- Tape or wrap it to neighboring spoke (prevent snagging)
- Re-true wheel (compensate for missing spoke)
- Ride cautiously to next resupply point
- Replace spoke as soon as possible
Carrying spare spokes:
- Tape appropriate-length spokes to chainstay
- Consider a folding spoke for easier packing
- Know your spoke length (different for drive/non-drive side)
Full wheel maintenance details in our wheel truing guide.
Tubeless Tire Maintenance
Most modern bikepacking setups use tubeless tires. They're more puncture-resistant and can run lower pressures, but they require specific maintenance.
Sealant: The Key to Tubeless Success
Sealant lifespan:
- Most sealants last 2-6 months before drying out
- Hot, dry climates accelerate drying
- Check and top up before every multi-day trip
Checking sealant level:
- Remove valve core
- Insert a spoke or straightened paperclip
- If it comes out dry past ½", add sealant
- Or shake wheel and listen for sloshing
Adding sealant:
- Remove valve core with valve core remover
- Break bead if necessary for easier access
- Add manufacturer-recommended amount (usually 2-4 oz per tire)
- Reinstall valve core
- Inflate and spin wheel to distribute
Bead Seating Techniques
Initial setup:
- Floor pump often works on loose-fitting tires
- Tubeless-specific pumps with reservoir help
- CO2 provides burst of pressure for stubborn beads
- Compressor is ideal but rarely available trailside
Trail re-seating:
- If bead burps, try the "Presta valve in tire" trick
- Remove valve core, inflate quickly, then seat core
- Worst case: install tube, ride to camp, reseat later
Trail Tubeless Repairs
For punctures:
- Try spinning wheel to let sealant work
- If bubbling continues, insert tire plug
- For large cuts, add an internal patch from tire boot material
- Boot material: dollar bill, gel wrapper, Tyvek envelope
- Worst case: install backup tube
Signs you need to run tubes:
- Bead damage from impacts
- Large sidewall tears
- Sealant completely dry with multiple punctures
Complete tubeless guidance in our tubeless tire maintenance guide.
Headset and Bottom Bracket Checks
Bearings in your headset and bottom bracket take constant stress. Catching problems early prevents trail failures.
Headset Inspection
Check for play:
- Apply front brake
- Rock bike forward and back
- Feel for clicking or movement in headset area
- Any play means adjustment needed
Check for roughness:
- Lift front wheel off ground
- Turn bars slowly through full range
- Feel for notchy spots (indexed feeling)
- Roughness indicates worn bearings
Trail adjustment:
- Loosen stem bolts
- Tighten top cap bolt until play disappears (don't overtighten)
- Retighten stem bolts to spec
- Recheck for play
Bottom Bracket Inspection
Check for play:
- Remove chain from chainring (easier to feel)
- Grasp cranks and wiggle side to side
- Any movement indicates worn BB or loose preload
- Different BB types require different fixes
Check for roughness:
- Remove chain
- Spin cranks by hand
- Feel for grinding, clicking, or resistance
- Roughness usually means replacement
Trail options are limited:
- External cup BBs can be tightened with large wrench
- Most BB issues require shop tools
- Ride cautiously and get to a shop
More details in our bearing maintenance guide.
Cable and Housing Inspection
Shift and brake cables do their job silently until they fail. Regular inspection prevents surprises.
What to Look For
Housing:
- Cracks or fraying of outer jacket
- Kinks that don't straighten
- Corrosion at cable stops or housing ends
- Stiff shifting/braking response
Inner cables:
- Fraying, especially at anchor bolts
- Corrosion or rust
- Stretched or kinked sections
- "Burrs" that catch on housing
When to Replace
Replace cables/housing if:
- Any visible fraying
- Significant corrosion
- Shifting/braking feels sluggish after lubing
- Cables show wear patterns at housing ends
- Before major expeditions as preventive maintenance
Carrying Spares
For extended trips, consider:
- One brake cable (inner wire)
- One shift cable (inner wire)
- Short sections of housing
- Cable end caps
Housing cutters make clean cuts that prevent fraying and catching.
See our cable replacement guide for step-by-step instructions.
Maintenance Schedule
Different components need attention at different intervals. This schedule assumes moderate bikepacking use:
Before Every Ride
- ABC Quick Check (Air, Brakes, Chain)
- Quick bolt check on loaded bags
- Visual inspection for obvious issues
Weekly / Every 200-300 Miles
- Chain cleaning and lubrication
- Detailed brake pad inspection
- Tire inspection for cuts or embedded debris
- Check quick release/thru axle tightness
Monthly / Every 500-1000 Miles
- Chain wear measurement
- Cassette and chainring inspection
- Full drivetrain cleaning
- Cable and housing inspection
- Headset and BB play check
- Tubeless sealant level check
Before Multi-Day Trips
- Full pre-trip inspection (see checklist above)
- Top up tubeless sealant
- Fresh chain lube
- Verify all tools function
- Practice any repairs you haven't done recently
Annually / Every 2000-3000 Miles
- Professional tune-up recommended
- Consider bearing service (headset, BB, hubs)
- Cable and housing replacement
- Brake bleed (hydraulic systems)
- Deep cleaning of all components
Complete Trail Repair Kit
What you carry depends on trip length and remoteness. Here's a tiered approach:
Minimal Kit (Day Rides/Well-Supported Routes)
| Item | Purpose | Weight |
|---|---|---|
| Multi-tool with chain breaker | Basic repairs | 150-200g |
| Tire levers (2) | Flat repair | 30g |
| Patch kit | Tube/tubeless repair | 30g |
| Spare tube | Flat backup | 120-180g |
| Mini pump or CO2 | Inflation | 80-120g |
| Quick links (2) | Chain repair | 10g |
Total: ~420-570g
Standard Kit (Overnighters/Weekend Trips)
All of the above, plus:
| Item | Purpose | Weight |
|---|---|---|
| Tubeless plugs | Puncture repair | 20g |
| Tire boot | Sidewall repair | 5g |
| Spare derailleur hanger | Critical spare | 20g |
| Zip ties (assorted) | Emergency fixes | 15g |
| Electrical tape | Versatile repair | 10g |
| Small rag | Cleaning | 20g |
Additional: ~90g | Total: ~510-660g
Extended Kit (Multi-Week/Remote Expeditions)
All of the above, plus:
| Item | Purpose | Weight |
|---|---|---|
| Spoke wrench | Wheel truing | 15g |
| Spare spokes (2-4) | Spoke replacement | 20g |
| Spare brake pads | Brake wear | 40g |
| Chain lube (small) | Extended lubrication | 30g |
| Shift cable | Cable failure | 20g |
| Brake cable | Cable failure | 20g |
| Valve cores (2) | Tubeless backup | 5g |
| Sealant (2 oz) | Tubeless refresh | 60g |
| Presta-to-Schrader adapter | Gas station inflation | 5g |
Additional: ~215g | Total: ~725-875g
For complete tool recommendations, see our building your tool kit guide.
Featured Products: Maintenance Essentials
Park Tool CC-3.2 Chain Checker
The most reliable way to measure chain wear and prevent expensive drivetrain damage. The CC-3.2 measures both 0.5% and 0.75% wear levels, so you know exactly when to replace your chain before it destroys your cassette. Drop the hook into the chain, read the indicator—it's that simple. At just 35 grams, there's no excuse not to carry one on extended trips. The stamped steel construction will outlast you. We've used the same checker for over a decade.
- Measures 0.5% and 0.75% wear
- Simple drop-in operation
- Steel construction lasts forever
- 35g—light enough to carry
- Industry standard accuracy
Finish Line Wet Bike Lubricant
When riding in wet conditions—rain, stream crossings, morning dew—Finish Line Wet provides long-lasting protection that doesn't wash away. The synthetic formula withstands water, mud, and grit while keeping your chain running smoothly for hundreds of miles. Yes, it attracts more dirt than dry lubes, but in genuinely wet conditions, that's the trade-off for lasting protection. Apply sparingly, wipe excess, and your drivetrain stays happy through whatever weather you encounter.
- Stays put in rain and stream crossings
- Long-lasting synthetic formula
- Excellent corrosion protection
- Works in extreme conditions
- 4 oz bottle perfect for extended trips
Finish Line Dry Teflon Lubricant
For dry, dusty conditions—which describes most bikepacking—Finish Line Dry Teflon runs cleaner than wet lubes while providing excellent protection. The Teflon-based formula dries to a waxy film that attracts less dirt and sand. It does require more frequent application, especially after water exposure, but your chain and cassette stay cleaner and wear slower. This is our default lube for summer desert trips and dry gravel.
- Runs clean in dusty conditions
- Teflon formula repels dirt
- Reduces wear on cassette
- Dries quickly for less mess
- 4 oz bottle for extended trips
SRAM PowerLock Chain Links
Quick links (master links) are the fastest way to repair a broken chain trailside. SRAM PowerLock links snap together by hand and are reusable up to 5 times with proper care. Available in 10, 11, and 12-speed versions—carry the size that matches your drivetrain. We keep two in our repair kit at all times. They're lighter than carrying extra chain sections and easier to use than pressing pins with a chain tool. Non-negotiable for any repair kit.
- Snap together by hand
- Reusable up to 5 times
- Available in 10/11/12-speed
- Faster than chain tool pin pressing
- Lightweight emergency essential
Park Tool MLP-1.2 Master Link Pliers
While quick links technically snap together by hand, removing them cleanly requires these pliers. The MLP-1.2 squeezes both link plates simultaneously for easy removal without damaging the link. This matters when you want to remove your chain for deep cleaning or need to remove a damaged section precisely. At 55 grams and $15, they're worth carrying for anyone doing extended trips where chain maintenance will be necessary. Also helpful for tight new links that are difficult to separate by hand.
- Clean, easy master link removal
- Won't damage reusable links
- Works on all quick link brands
- 55g light enough to carry
- Makes chain cleaning easier
Shimano B01S Resin Disc Brake Pads
Shimano's B01S pads fit a huge range of their disc brake calipers, making them an easy spare to carry. The resin compound provides good modulation and is gentle on rotors, though it wears faster than metallic pads in wet/muddy conditions. At a few dollars per pair, buy several—leave a set in your repair kit and fresh pairs at home. These are consumable items; running pads to metal destroys rotors and compromises safety. We carry a spare pair on any trip over three days.
- Fits wide range of Shimano calipers
- Good modulation and feel
- Gentle on rotors
- Inexpensive enough to stock up
- Easy to swap trailside
When to Seek Professional Help
DIY maintenance handles most issues, but some problems require professional tools, expertise, or parts:
Seek Help For
Hydraulic brake bleeding:
- Requires specific fluid and bleed kit
- Contaminated fluid degrades braking dramatically
- Improper technique introduces air bubbles
Bottom bracket service:
- Most BB types require special tools
- Creaking often indicates need for replacement
- Wrong diagnosis can damage frames
Wheel building/major truing:
- Proper tension requires spoke tensiometer
- Major truing without stand risks making things worse
- Broken flange or cracked rim is shop territory
Suspension service:
- Requires specific oils, seals, and tools
- Improper service damages internals
- Usually warranty-voiding if done incorrectly
Frame/fork damage assessment:
- Carbon requires professional inspection
- Cracked metal is unrepairable
- Alignment issues affect handling safety
Electronic shifting:
- Firmware and pairing requires brand-specific tools
- Component replacement requires registration
- Diagnostic tools are proprietary
Before You Leave Home
If you're planning remote routes:
- Have a full tune-up at a reputable shop
- Ask them to flag any concerns
- Stock up on consumables (brake pads, chain, sealant)
- Get fitted with fresh cables and housing
The Maintenance Mindset
Every mile of prevention is worth a hundred miles of repair.
Mechanical self-sufficiency isn't about becoming a master mechanic. It's about understanding your bike well enough to:
- Recognize problems before they strand you
- Fix common issues without professional help
- Know the limits of field repair
- Make smart decisions about ride or walk
Build these skills gradually. Practice repairs at home before you need them on trail. Every trip is an opportunity to learn something new about your bike.
FAQ
How often should I clean my chain on a bikepacking trip?
In dry conditions, a wipe-down and relube every 2-3 days keeps things running smoothly. In wet or sandy conditions, daily cleaning may be necessary. Listen to your drivetrain—grinding or excessive noise means it's time for attention.
Can I mix brake pad types (resin vs. metallic)?
You can switch types, but you should bed in the new pads and ideally clean the rotor surface when switching. Don't mix pad types on the same wheel at the same time.
My tubeless tire won't seal. What now?
First, check sealant level—it may have dried out. If sealant is fresh, the hole may be too large for sealant alone. Try a tire plug. For persistent leaks, the bead may be damaged or the tire casing compromised. Install a tube and investigate later.
Do I really need a torque wrench?
For carbon components (handlebars, seatpost, stem), yes. Over-torquing can cause invisible damage that leads to catastrophic failure. For aluminum components with recommended torque specs, a torque wrench prevents problems. We carry a small preset torque key for critical carbon interfaces.
What's the most common trailside repair?
Flat tires by far, followed by chain issues, then brake rubbing, then shifting problems. Master flat repair first, then work outward from there.
How do I know if my chain is too worn?
Use a chain checker tool. Replace at 0.5% elongation for best drivetrain life, or 0.75% maximum. A worn chain accelerates wear on your cassette and chainrings—the chain is the cheapest part of the system.
Related Guides
Build your maintenance knowledge with our detailed guides:
- Chain Maintenance Guide - Cleaning, lubing, and replacing
- Disc Brake Maintenance - Pads, rotors, and contamination
- Tubeless Tire Maintenance - Sealant, plugs, and repairs
- Wheel Truing & Spoke Repair - Emergency truing techniques
- Derailleur Adjustment - Indexing and limits
- Building Your Tool Kit - What to carry
- Cable Replacement Guide - When cables need attention
- Bike Cleaning Methods - Trail and home cleaning
- Emergency Field Repairs - Creative fixes when standard repairs fail
For emergency preparedness beyond mechanical issues, see our Emergency Gear Guide and First Aid Kit Guide.
Keep your bike happy, and it'll carry you anywhere. Master these skills, pack the right tools, and mechanical problems become minor interruptions rather than trip-ending disasters.
The trail is waiting.


