Disc Brake Maintenance for Bikepacking: Pads, Rotors, and Trail Fixes
20+ years testing gear in Colorado backcountry
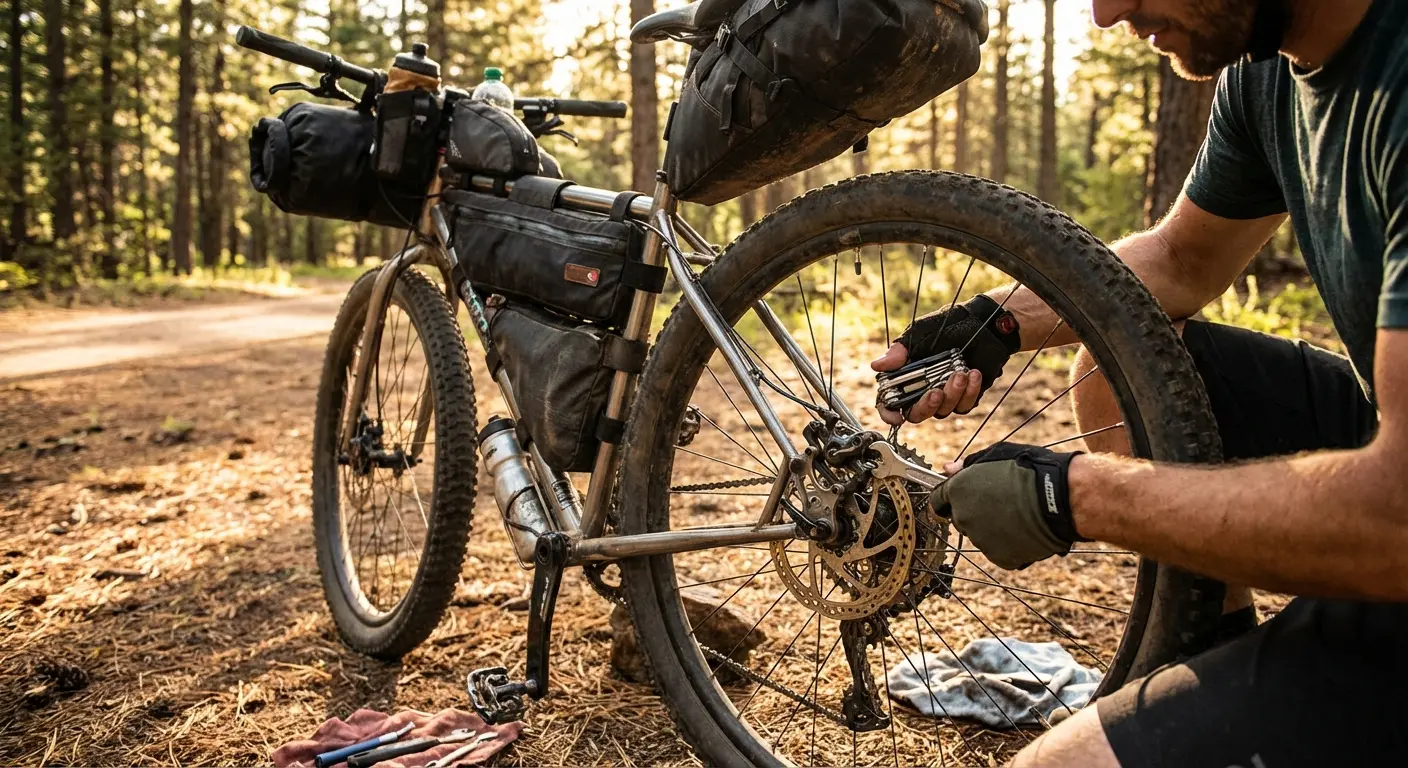
Stopping Power You Can Trust
On a loaded bike descending a remote mountain pass, your brakes are the difference between exhilarating and terrifying. Proper maintenance ensures they're ready when you need them most.
Disc brakes transformed bikepacking. Consistent stopping power in wet conditions, minimal rim wear from loaded descents, and reliable performance mile after mile. But that reliability depends on maintenance—and neglected disc brakes fail at the worst possible moments.
This guide covers everything you need to keep your disc brakes working perfectly: pad inspection and replacement, rotor alignment, contamination fixes, and trailside repairs. Master these skills and your brakes will never let you down.
For the complete maintenance picture, see our Complete Bikepacking Maintenance Guide. For emergency repair essentials, check our Multi-Tool Guide.
Understanding Your Disc Brakes
Before diving into maintenance, understand what you're working with.
Brake Types
Mechanical disc brakes:
- Cable-actuated (like rim brakes)
- Adjustable without special tools
- Easier field repair
- Common on budget and touring bikes
Hydraulic disc brakes:
- Fluid-actuated (sealed system)
- Self-adjusting pad position
- More powerful and consistent
- Requires bleeding for internal work
- Standard on most modern bikes
Components
- Lever - Your control interface
- Caliper - Houses pads, creates clamping force
- Pads - Friction material that contacts rotor
- Rotor - The disc mounted to your hub
- Pistons - Push pads against rotor (2 or 4)
- Cable/hose - Transmits force from lever to caliper
Pad Inspection and Replacement
Brake pads wear with every stop. On loaded bikes doing long descents, they wear faster. Regular inspection prevents surprises.
When to Check
- Before every multi-day trip
- Monthly during regular riding
- After wet/gritty conditions
- When braking feels or sounds different
- If you hear metal-on-metal scraping
What to Look For
Visual inspection:
- Look through caliper slot (wheel installed)
- Shine light to see pad thickness
- Compare both pads—should wear evenly
- Check for contamination (shiny, glazed appearance)
Performance indicators:
- Lever pulls closer to bar before engagement
- Squealing or grinding sounds
- Reduced stopping power
- Inconsistent braking feel
Pad Types
Resin (organic) pads:
- Quieter operation
- Better modulation (feel)
- Gentler on rotors
- Wear faster, especially when wet
- Best for dry conditions and lighter use
Metallic (sintered) pads:
- Better wet performance
- Longer lasting
- More powerful braking
- Noisier, especially when cold
- Can be harsher on rotors
- Best for loaded bikepacking
Semi-metallic:
- Middle ground between resin and metallic
- Good all-around choice
- Moderate noise and wear
Replacing Pads
What you'll need:
- New pads (correct model for your caliper)
- Flat blade screwdriver or brake piston tool
- Allen keys (for caliper bolts if needed)
- Isopropyl alcohol and clean rag
Steps:
- Remove wheel - Gives access to caliper
- Note pad orientation - Some pads are directional
- Remove pad retention - Bolt, pin, or spring clip depending on caliper
- Remove old pads - Slide out carefully
- Push pistons back - Use flat tool, push evenly on both sides
- Clean pistons - Wipe with isopropyl alcohol if dirty
- Insert new pads - Ensure correct orientation and spring placement
- Reinstall retention - Bolt, pin, or clip
- Reinstall wheel - Check rotor fits between pads
- Squeeze lever several times - Brings pads to rotor contact
- Bed in new pads - See below
Bedding In New Pads
New pads need to be bedded in for optimal performance:
- Find a safe area with gradual descent
- Accelerate to moderate speed (15-20 mph)
- Apply brakes firmly but don't skid
- Slow nearly to a stop
- Release and accelerate again
- Repeat 15-20 times per brake
- Allow brakes to cool if they feel hot
Bedding deposits a layer of pad material on the rotor for consistent, powerful braking.
Rotor Alignment and Truing
Rotors can become warped from heat, impacts, or manufacturing defects. Even minor warps cause rubbing and reduced performance.
Diagnosing Rotor Issues
Rubbing:
- Listen for rhythmic scraping when spinning wheel
- Watch gap between pad and rotor as wheel spins
- Mark rotor at rubbing spot with tape
Warped rotor symptoms:
- Pulsing brake feel
- Consistent rubbing at one spot per rotation
- Visible wobble when viewing rotor edge-on
Caliper Alignment (The Easy Fix)
Before truing the rotor, ensure your caliper is centered:
- Loosen caliper mounting bolts slightly (don't remove)
- Squeeze brake lever firmly and hold
- Tighten caliper bolts to spec while holding lever
- Release lever
- Spin wheel to check for rubbing
This centers the caliper on the rotor. Most rubbing issues are caliper alignment, not rotor true.
Rotor Truing (Trail Method)
If caliper alignment doesn't solve rubbing:
Simple hand method:
- Identify where rotor contacts pad (mark with tape)
- Remove wheel for better access
- Sight down rotor to identify warp direction
- Using clean hands or clean rag, carefully bend rotor
- Apply gentle, gradual pressure opposite the warp
- Reinstall wheel and check
- Repeat as needed—work in small increments
Using rotor truing tool:
- Install wheel, identify high spot
- Place tool around rotor at high spot
- Apply gentle leverage to bend rotor
- Check and repeat until true
Rotor Maintenance
- Clean rotors regularly with isopropyl alcohol
- Never spray lubricants near brake area
- Check rotor bolts periodically (Torx T25 typically)
- Inspect for wear - most rotors have minimum thickness markings
- Replace if cracked, deeply grooved, or below minimum thickness
Contamination: The Silent Killer
How Contamination Happens
- Chain lube overspray
- Bike wash products
- Greasy hands touching pads/rotors
- Road spray (oil on wet roads)
- Hydraulic fluid leak
Signs of Contamination
- Squealing that doesn't go away
- Dramatically reduced braking power
- Grabby, inconsistent feel
- Glazed or shiny pad surface
- Greasy appearance on rotor
Attempting Recovery
For rotors:
- Clean thoroughly with isopropyl alcohol
- Sand lightly with fine sandpaper (400 grit)
- Clean again with isopropyl alcohol
- Allow to dry completely
For pads (often unsuccessful):
- Remove pads from caliper
- Sand braking surface to remove glazing
- Heat with torch to burn off contamination (if metallic)
- Soak in isopropyl alcohol
- Test—if still contaminated, replace
Reality check: If braking is significantly compromised after cleaning, replace pads. Your safety isn't worth saving a few dollars.
Prevention
- Cover brakes when lubing chain - Remove wheel or drape rag over caliper
- Keep hands clean when working on brakes
- Use dedicated bike wash that's brake-safe
- Store bike with brakes covered if spraying anything nearby
- Apply chain lube carefully - don't overspray
Hydraulic Brake Issues
Hydraulic systems are mostly sealed and self-adjusting, but problems can occur.
Spongy Lever Feel
Cause: Air in the system
Trail fix options:
- Usually no field fix available
- Try firmly pumping lever 20-30 times
- Sometimes air works itself out
- Reduce brake use on descents if possible
- Get to a shop for proper bleed
Brake Fade on Long Descents
Cause: Heat buildup in fluid and rotors
Prevention:
- Feather brakes rather than dragging constantly
- Alternate between front and rear
- Stop periodically to let brakes cool
- Consider larger rotors for loaded bikepacking
If fade occurs:
- Stop and allow cooling (5-10 minutes)
- Don't pour water on hot rotors (thermal shock)
- Consider walking steep descents if fade persists
Lever Stroke Changing
Possible causes:
- Pads wearing down (normal)
- Air in system (needs bleed)
- Leak somewhere (inspect hoses and fittings)
Trail assessment:
- If lever firmness is consistent, likely just pad wear
- If lever slowly loses firmness after squeezing, suspect leak
- Inspect hose connections and caliper for fluid
What You Can't Fix Trailside
- Brake bleeding (requires specific fluid and kit)
- Hose replacement
- Major leaks
- Piston rebuild
For these issues, reduce speed, favor one brake if the other fails, and reach repair facilities. For improvisation techniques when standard repairs aren't possible, see our Emergency Field Repairs Guide.
Mechanical Disc Brake Adjustments
If you have cable-actuated disc brakes, more adjustments are possible trailside:
Cable Tension Adjustment
For weak braking or lever close to bar:
- Find barrel adjuster (on lever or caliper)
- Turn counterclockwise to increase tension
- Test lever feel
- Adjust until brake engages at desired lever position
Pad Adjustment
Many mechanical calipers have:
- Inner pad adjustment (stationary pad)
- Outer pad moves via cable pull
Adjustment:
- Turn inner pad adjustment knob to move pad closer to rotor
- Adjust until slight rotor contact, then back off 1/4 turn
- Cable tension moves outer pad—adjust as above
- Goal: both pads contact rotor at same lever pull
Cable Replacement
For complete cable replacement procedures, see our Cable Replacement Guide.
If cable frays or breaks:
- Release cable anchor bolt
- Pull old cable through housing
- Thread new cable through housing
- Anchor at caliper, set appropriate tension
- Trim excess, crimp end cap
Featured Products
Shimano B01S Resin Disc Brake Pads
Shimano's B01S pads fit a huge range of their disc calipers, making them the easiest spare to stock. Resin compound provides good modulation and quiet operation in dry conditions. They wear faster than metallic pads in wet/muddy conditions, but at a few dollars per pair, buy several sets. Keep a pair in your repair kit for any trip over a few days. We've run these on everything from commuters to loaded touring bikes—reliable, consistent, and inexpensive.
- Fits wide range of Shimano calipers
- Quiet operation
- Good feel and modulation
- Inexpensive—stock up
- Easy trailside swap
SwissStop Disc Brake Pads
When you want the best braking performance available, SwissStop delivers. Their organic compound provides exceptional modulation and power while remaining gentle on rotors. These are the pads professional mechanics recommend when clients ask for an upgrade. Excellent wet weather performance for an organic pad, and remarkably quiet. More expensive than OEM, but the braking feel is noticeably improved. We run these on bikes where braking matters most.
- Professional-grade performance
- Excellent modulation
- Quiet operation
- Good wet weather performance
- Long-wearing compound
Park Tool DT-2 Rotor Truing Fork
When your rotor rubs and caliper realignment doesn't fix it, the DT-2 trues rotors without removing them from the bike. The gauge identifies high and low spots, then the fork applies precise, controlled bending pressure. Works on rotors from 160-203mm. More consistent than hand-bending and less risky for the rotor. At home, it's the fastest way to eliminate annoying rubs. On tour, the 38g weight might not be worth it, but for home maintenance it's essential.
- True rotors without removal
- Gauge identifies warp location
- Controlled, precise bending
- Works 160-203mm rotors
- Prevents over-correction
Muc-Off Disc Brake Cleaner
Purpose-formulated for disc brakes, Muc-Off cleaner removes contamination without leaving residue that could affect braking. Safe for all brake components including seals. Spray, wipe, done. We use this after any chain lubrication session and whenever brakes start sounding or feeling off. Not a guaranteed contamination fix, but the best cleaning option we've found. Evaporates clean without the strong odor of pure isopropyl alcohol.
- Formula designed for brakes
- Safe for seals and pads
- Leaves no residue
- Quick-drying
- Removes oil and contaminants
99% Isopropyl Alcohol
The simplest brake cleaning solution. Isopropyl alcohol dissolves oils and evaporates completely with no residue. Apply to clean rag and wipe rotors and pads. Every home shop should have a bottle, and a small travel bottle in your repair kit weighs almost nothing. Not as convenient as aerosol, but cheaper and equally effective. We use this for routine cleaning and save the specialty cleaners for major contamination.
- Dissolves brake contamination
- Evaporates with no residue
- Extremely affordable
- Multi-use (first aid, cleaning)
- Available everywhere
Jagwire Pro Quick-Fit Kit
For mechanical disc brake systems, the Jagwire kit provides everything for cable replacement: pre-stretched cables, low-compression housing, and all necessary hardware. The slick-coated cables run smoother and last longer than OEM. Perfect for pre-trip cable replacement or emergency repair. The kit includes both shift and brake cables, making it a comprehensive solution. Housing cutters sold separately but essential for clean cuts.
- Complete cable set
- Pre-stretched cables
- Low-compression housing
- All end caps included
- Works for brakes and shifting
Brake Maintenance Schedule
| Interval | Action |
|---|---|
| Every ride | Lever feel check, listen for rubbing |
| Weekly | Visual pad thickness check |
| Monthly | Rotor cleaning, bolt torque check |
| Before multi-day trips | Full inspection, fresh pads if marginal |
| Annually | Hydraulic bleed, cable replacement (mechanical), rotor inspection |
| As needed | Pad replacement, contamination response |
FAQ
How long do brake pads last?
Highly variable based on conditions, riding style, and pad compound. Loaded bikepacking with frequent descents might use a set in 500-1000 miles. Lighter use might see 2000+ miles. Check visually rather than relying on mileage.
Can I mix pad types?
Generally yes, but don't mix pads within the same caliper (front or rear should match). You can run different compounds front vs. rear. Some riders prefer metallic front (more power) and resin rear (better modulation).
Why are my brakes squealing?
Common causes: contamination, glazed pads, misaligned caliper, worn pads. Start with cleaning and realignment. If squealing persists with clean, properly aligned brakes, consider new pads.
Do larger rotors make a difference?
Yes. Larger rotors provide more leverage (stopping power) and better heat dissipation. For loaded bikepacking, 180mm is minimum; 200-203mm front is even better. The weight penalty is minimal compared to the performance gain.
How do I know if my rotors are worn?
Most rotors have minimum thickness stamped on them (often 1.5mm). Measure with calipers or feel for deep grooves. If rotors are significantly worn, replace before they fail catastrophically.
Can I bleed hydraulic brakes myself?
Yes, with the proper kit (bleed syringe, correct fluid for your system). However, it requires specific technique and the right fluid (DOT fluid or mineral oil depending on brand—never mix). Most bikepackers have shops do this work.
Related Guides
- Complete Bikepacking Maintenance Guide - Full maintenance overview
- Emergency Gear Guide - What to carry for emergencies
- Multi-Tool Guide - Essential tools
- Pre-Trip Inspection Checklist - Full inspection walkthrough
Your brakes are your ultimate safety system. On loaded descents in remote areas, they're the margin between controlled adventure and uncontrolled emergency.
Inspect regularly. Maintain proactively. Carry spares for extended trips.
Trust your brakes, and they'll bring you home safely.


