How to Pack Your Bikepacking Bags: Weight Distribution
20+ years testing gear in Colorado backcountry
Balance Matters
Weight distribution isn't complicated, but it's often overlooked. New bikepackers stuff bags randomly and wonder why their bike feels unstable. As REI's bikepacking experts explain, the principles are simple once understood—and they transform your ride.
This guide covers where to pack what, why it matters, and how to dial in your personal system.
For bag selection, see our Complete Bag Guide and Saddle Bag Guide.
Core Principles
Low and Centered
Weight closest to your center of gravity (near the bottom bracket) has the least impact on handling. Weight high and far from center creates instability.
The priority order:
- Frame bag (lowest impact on handling)
- Saddle bag (moderate impact)
- Handlebar bag (highest impact—keep light)
- Fork cages (low, but extends wheelbase feel)
Front-Back Balance
Roughly 50-50 front-to-rear weight distribution maintains neutral handling. Too rear-heavy causes front wheel wandering; too front-heavy causes heavy steering.
Signs of imbalance:
- Front wheel lifting on climbs = too rear-heavy
- Heavy, slow steering = too front-heavy
- Bike feels "different" than normal = check balance
Secure and Stable
Shifting loads are dangerous. Everything should be secured so it can't move while riding, especially on rough terrain.
The Figure-8 Test
Before every trip, run this quick handling check:
- Load your bike completely
- Ride to an empty parking lot
- Ride figure-8 patterns at various speeds
- Note any pulling to one side (left-right imbalance)
- Try emergency stops (does the bike dive or stay controlled?)
- Stand and pedal (any knee interference?)
If something feels wrong, adjust before you're on a mountain pass. This 10-minute test prevents hours of frustration.
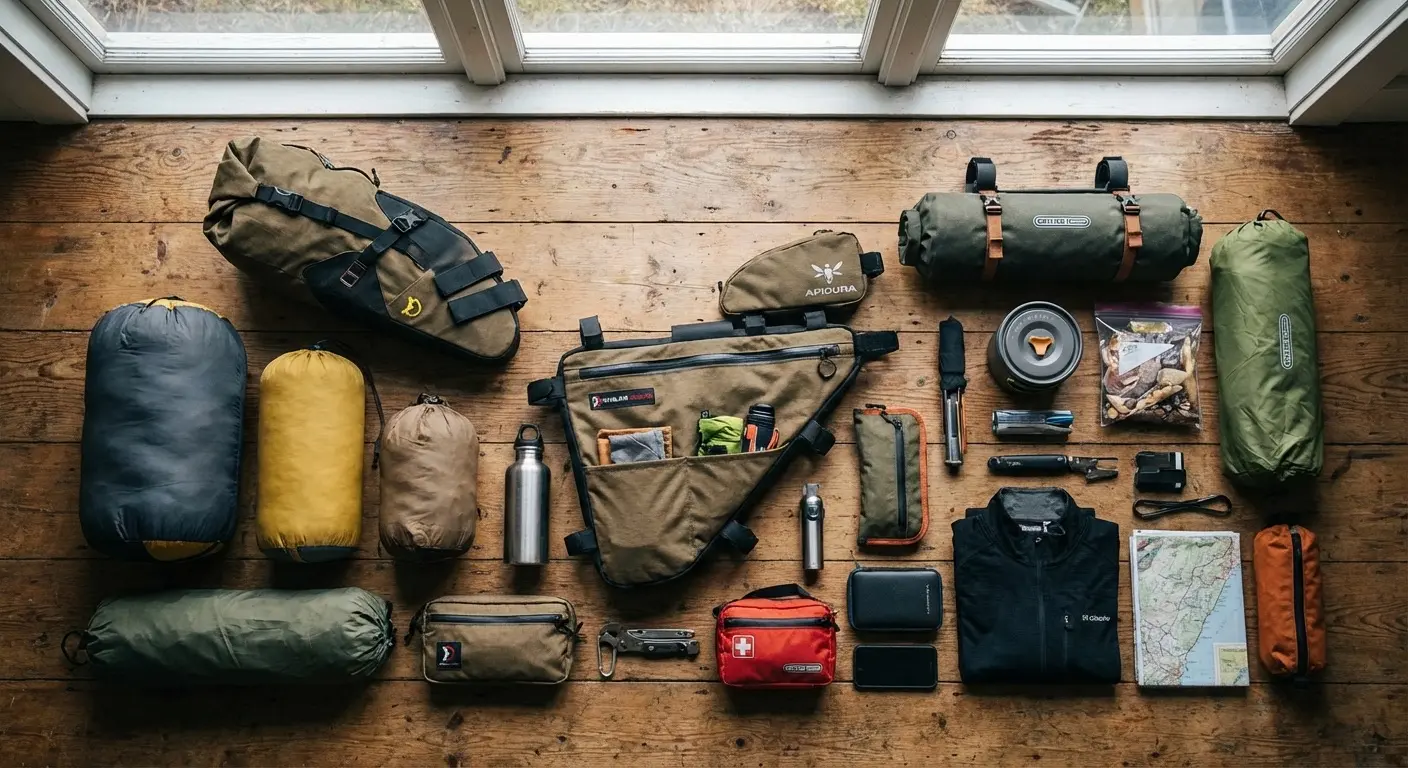
Frame Bag Packing
What Goes Here
Your heaviest items. The frame bag position minimizes handling impact.
Ideal contents:
- Water (if using bladder)
- Tools and repair kit
- Heavy electronics (battery packs)
- Dense food items
- Rain gear (compact and dense)
Packing Strategy
Bottom: Heaviest items (tools, dense items)
Middle: Medium-weight items (battery, rain jacket)
Top: Lighter items, things you access frequently
Away from knees: Items that might shift or have corners
Tips
- Fill space completely—loose items shift
- Pad sharp objects to prevent bag wear
- Consider organizational pouches for small items
- Leave minimal dead space
Saddle Bag Packing
What Goes Here
Bulky, lightweight items. The saddle bag position handles volume well but handles weight poorly.
Ideal contents:
- Sleeping bag
- Sleeping pad (if it fits)
- Puffy jacket
- Extra clothing layers
- Tent body (sometimes)
Packing Strategy
Bottom of bag (closest to saddle): Densest items—they stabilize the bag
Main body: Bulky insulation (sleeping bag, clothes)
Top/Outside pockets: Light items, emergency access
Roll-top closure: Don't over-pack—bags need room to close properly
Tips
- Compress sleeping bag but don't over-compress (wears insulation)
- Put sleeping bag in dry bag for extra protection
- Pack so weight sits close to seatpost, not swinging at end
- Stabilizer straps keep bag from swaying—use them
Handlebar Bag Packing
What Goes Here
Light items, things you need access to while riding, and protection from weight transfer during braking.
Ideal contents:
- Tent (poles and fly)
- Sleeping pad (if rolled externally)
- Light camp items
- Extra layer for quick access
- Items you won't need during riding
Packing Strategy
Center: Whatever gives best shape and stability
Avoid: Heavy water bottles, tools, anything dense
Roll compression: Handlebar rolls work best when evenly filled
Why Weight Matters Here
Handlebar weight affects steering directly. Heavy loads cause:
- Slow, heavy steering
- Front wheel dive during braking
- Increased fatigue in arms and shoulders
- Poor handling on technical terrain
Keep handlebar load under 5-7 lbs if possible.
Tips
- Stuff sacks help organize contents
- Don't strap items on top that can shift
- Consider harness systems that stabilize roll
- External straps should be secure, not dangling
Top Tube and Feed Bags
What Goes Here
Items you need while riding—frequent access without stopping.
Ideal contents:
- Snacks and food
- Phone
- Sunscreen, lip balm
- Small camera
- Battery pack (if charging while riding)
Packing Strategy
Riding side: Snacks (frequent access)
Non-riding side or back: Less frequent items
Avoid: Anything that will bump your knees, anything heavy
Tips
- Check knee clearance before departure
- Magnetic or zipper closures should work one-handed
- Waterproof phone pocket is valuable
- Don't overload—these bags are small for a reason
Fork Cages and Anything Cages
What Goes Here
Water bottles, fuel canisters, or cargo cages with dry bags.
Common loads:
- Water bottles (ideal use)
- Fuel canisters for cooking
- Dry bags with tent, clothes, or overflow gear
Packing Strategy
Match left and right: Equal weight on both forks for balanced handling
Low mounting: Keeps center of gravity low
Secure attachment: Fork loads must not shift or rotate
Tips
- Three-bolt cages are more secure than two-bolt
- Check for frame/fork compatibility before buying
- Voile straps work for odd-shaped loads
- Don't exceed fork cage weight ratings
Common Configurations
Overnight (Light Setup)
Frame bag: Tools, snacks, rain jacket Saddle bag: Sleep kit, extra layer Handlebar bag: Tent or bivy Top tube bag: Phone, snacks
Total weight: 10-15 lbs of gear
Multi-Day (Standard Setup)
Frame bag: Tools, battery, water, heavy food, rain gear Saddle bag: Sleeping bag, pad, extra clothes Handlebar bag: Tent, light insulation Top tube bag: Food, phone, camera Fork cages: Extra water, fuel
Total weight: 15-25 lbs of gear
Expedition (Maximum Capacity)
All of the above, plus:
- Additional fork cage dry bags
- Rear rack or additional harness bags
- Extra water capacity
- Extended food carries
Total weight: 25-35+ lbs of gear
The Pre-Departure Reality Check
Two simple tests before every trip:
The Shake Test: Grab your loaded bike by the top tube and shake vigorously. Listen for:
- Rattling tools (wrap in cloth or rubber band)
- Sloshing water (fill bottles completely or leave at one-third)
- Clunking items shifting (add packing cubes or stuff sacks)
The Parking Lot Lap: Ride two quick laps around your block. Check for:
- Bags rubbing tires or frame
- Straps working loose
- Items bouncing or shifting
- Knee clearance while pedaling
These 5 minutes prevent mid-ride frustration. Even experienced bikepackers catch issues this way—do them every time.
Adjusting for Conditions
Technical Terrain
Priority: Low weight, centered mass, stable attachment
Adjustments:
- Move weight from handlebar to frame bag
- Tighten all straps
- Remove anything that could swing
- Accept less cargo capacity for better handling
Climbing-Heavy Routes
Priority: Rear-ward weight to keep front wheel down
Adjustments:
- Slightly more weight to saddle bag
- Don't overload handlebar
- Check that front wheel stays planted when seated
Descending-Heavy Routes
Priority: Stable front end, predictable braking
Adjustments:
- Lighter handlebar load
- Ensure nothing can shift forward during braking
- Consider frame bag bias
Gravel and Road
Priority: Comfort over handling precision
Adjustments:
- Weight distribution less critical
- Prioritize accessibility and comfort
- More flexibility in packing
Troubleshooting
Bike Feels Unstable
Likely causes:
- Too much weight high (handlebar, top of saddle bag)
- Uneven left-right distribution
- Loose straps allowing movement
Fixes:
- Move heavy items to frame bag
- Balance fork cargo
- Secure all attachment points
Front Wheel Wanders
Likely causes:
- Rear-heavy distribution
- Light front tire pressure
- Heavy rider position (sitting too far back)
Fixes:
- Move weight forward
- Check tire pressure
- Shift riding position
Bike Feels Slow and Heavy
Likely causes:
- Too much total weight (overpacked)
- Dense items in wrong positions
- Drag from loose straps or poorly shaped loads
Fixes:
- Remove unnecessary items
- Redistribute weight lower
- Streamline external attachments
Saddle Bag Sways
Likely causes:
- Overpacked beyond capacity
- Loose stabilizer straps
- Weight too far from seatpost
Fixes:
- Remove items to proper fill level
- Tighten stabilizer straps to frame/seatpost
- Repack with dense items toward seatpost
Arms Fatigue Quickly
Likely causes:
- Handlebar too heavy
- Poor weight balance (leaning on hands)
- Incorrect cockpit setup
Fixes:
- Reduce handlebar load
- Check overall front-rear balance
- Consider bar position adjustment
The Loading Process
At Home
- Gather all gear: Lay out everything you're bringing (use our bikepacking packing list to ensure you don't forget anything)
- Sort by bag: Assign items to appropriate positions
- Pack each bag completely: Start with frame, then saddle, then handlebar
- Mount on bike: Install all loaded bags
- Test ride: Ride around the block, check handling
- Adjust: Move items if handling isn't right
- Note your setup: Remember what worked for next time
In the Field
- Develop a system: Same items in same places
- Morning routine: Pack in consistent order
- Quick adjustments: Move items between bags if needed
- End of day: Evaluate what worked, what didn't
Packing Order Matters
Easy to find: Items you need first should be packed last (or in accessible pockets)
Protection: Fragile items protected by soft items
Dry storage: Wet items separate from dry items
Weight Tracking
Know Your Base Weight
Base weight: Everything except consumables (water, food, fuel)
Why it matters: Helps you plan and improve over time
Weighing Your Setup
Simple bathroom scale works:
- Weigh yourself
- Weigh yourself holding loaded bike
- Subtract
Or weigh individual bags with a digital luggage scale—invaluable for tracking pack weight and identifying where to cut grams.
What to Track
| Category | Target Range |
|---|---|
| Frame bag (loaded) | 3-8 lbs |
| Saddle bag (loaded) | 3-7 lbs |
| Handlebar bag (loaded) | 3-6 lbs |
| Top tube/accessories | 1-2 lbs |
| Fork cargo | 2-6 lbs |
| Total gear weight | 12-25 lbs |
FAQ
How much weight is too much for a handlebar bag?
Most riders notice handling changes above 5-7 lbs. Some tolerate more on smooth surfaces. For technical terrain, lighter is always better.
Should I use compression sacks inside bags?
Sometimes. They help organize and waterproof items. But over-compression wastes space and can damage insulation. Use selectively.
Can I carry gear on a rear rack for bikepacking?
Yes, but it changes the bikepacking aesthetic and limits trail capability. Small racks work for gravel; full racks move toward touring.
How do I pack food for multi-day trips?
High-density food (bars, nuts, dried meals) in frame bag. Bulky but light items (chips, bread) in top tube or handlebar pockets. Frequent snacks in accessible positions.
Does weight distribution change for different bikes?
Somewhat. Long-wheelbase bikes tolerate more rear weight. Short, nimble bikes need better balance. Full suspension bikes benefit from centered weight. Adjust for your specific bike's characteristics.
Dial It In
Weight distribution improves with experience. Your first trip teaches more than any guide. But starting with good principles prevents the worst handling mistakes. For more trip preparation tips, see our guide on common bikepacking mistakes to avoid.
Pay attention to how your bike feels. When something seems off, it usually is. Small adjustments make big differences. Your system will evolve with every trip.
For bag recommendations, see our Complete Bag Guide. For complete gear lists, check our Packing List.
Pack smart. Ride balanced.


