Hammock Bikepacking: Is It Practical?
20+ years testing gear in Colorado backcountry
Sleeping Suspended
Hammocks promise comfort, simplicity, and freedom from flat ground. For some bikepackers, they deliver exactly that. For others, they're impractical weight that never works out. The community at r/hammockcamping provides extensive discussion on what works for bike-based adventures.
The honest answer: hammocks can work brilliantly for bikepacking—but only in the right conditions, with the right setup, and for the right person. Understanding when hammocks make sense (and when they don't) helps you decide if they fit your riding style. For complete beginner guidance, see our first bikepacking trip guide.
This guide covers practical hammock bikepacking, from system selection to setup techniques.
For ground-based alternatives, see our Best One-Person Tents and Bivys Guide.
When Hammocks Work
Ideal Conditions
Forested routes: Hammocks need trees. Routes through consistent forest cover provide reliable hang spots.
Humid climates: Hammocks elevate you above wet ground and provide airflow in muggy conditions.
Warm weather: Three-season hammocking is straightforward. Cold weather adds significant complexity.
Solo travel: Hammocks are inherently individual. Couples need separate hammocks.
Established trees: Need sturdy trees 12-15 feet apart. Not all forests qualify.
The Hammock Sweet Spot
Hammock bikepacking works best in:
- Southeastern US (forested, humid)
- Pacific Northwest (abundant trees)
- Appalachian regions (continuous forest)
- Central American routes (tropical forest)
- Any route with reliable tree coverage
When Hammocks Fail
Problematic Terrain
Above treeline: No trees, no hammock. Alpine routes eliminate hammocks entirely.
Desert and plains: Sparse vegetation means no reliable hangs.
Prairie and grasslands: Beautiful riding, nowhere to sleep suspended.
Coastal routes: Often treeless or with wind-battered vegetation.
Challenging Conditions
Cold weather: Underquilt required (adds weight/bulk). Ground insulation is simpler.
High winds: Hammocks catch wind. Exposed sites become uncomfortable or dangerous.
Popular campgrounds: May lack appropriate trees or allow hammock straps.
Private land: Hammock camping is more visually obvious than ground camping.
Route Reality Check
Before committing to hammock setup, review your entire route:
- What percentage has reliable tree coverage?
- Are there treeless sections longer than a day's ride?
- What's your backup plan for no-tree zones?
If significant sections lack trees, hammocks add complexity without benefit.
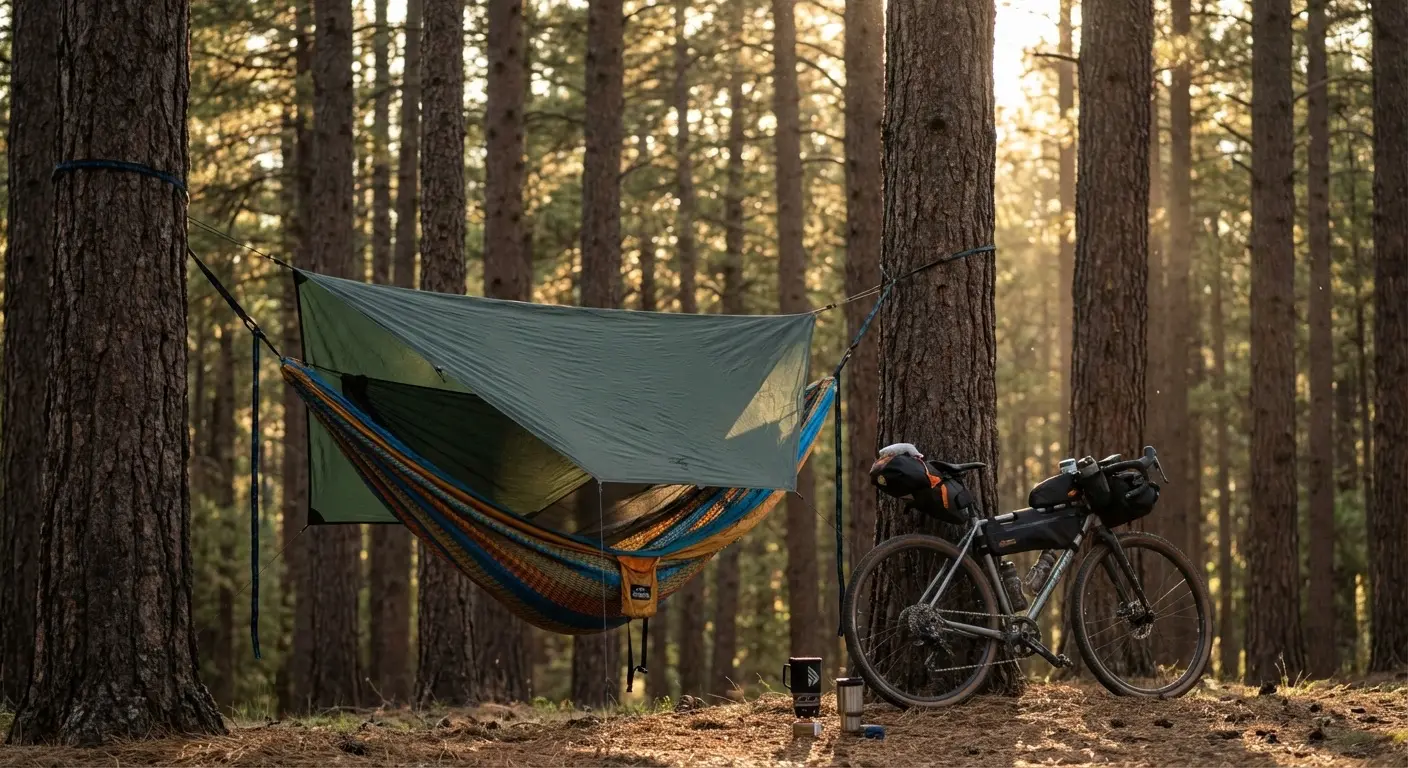
Complete Hammock System
The Hammock Itself
Gathered-end hammocks: Most common. Fabric gathered at each end, hung from straps. Lighter and packable.
Bridge hammocks: Flatter lie through spreader bars. Heavier, less packable. Better for side sleepers.
For bikepacking: Gathered-end hammocks win on weight and pack size. Accept the slight curve or learn the diagonal lay technique.
Weight target: 12-20 oz for quality hammock. Ultralight options exist under 12 oz.
Suspension System
Tree straps: Wide straps protect bark and provide adjustable attachment points.
Whoopie slings: Ultralight alternative using Dyneema cord. Learning curve but significant weight savings.
Continuous loop: Simple cord loops at hammock ends; straps handle adjustment.
Weight target: 3-8 oz for complete suspension.
Rain Protection
Tarp: Essential for rain and provides psychological shelter. Hung above hammock on separate line.
Tarp sizing: 10-11 ft covers most hammocks adequately. Larger tarps provide more coverage but add weight.
Tarp shapes: Rectangular (versatile), hex/diamond (lighter), asymmetric (optimized).
Weight target: 10-20 oz for quality tarp.
Bug Protection
Integrated net: Some hammocks include sewn-in bug netting. Convenient but adds weight even when not needed. The Kammok Mantis UL offers a quality integrated option.
Separate net: Allows leaving it home in bug-free seasons. More versatile but additional setup. Sea to Summit Nano Bug Net works with most hammocks.
Weight target: 4-8 oz for bug netting.
Insulation
Top quilt: Replaces sleeping bag on top. Works like a blanket—no weight on compressed insulation.
Underquilt: Hangs beneath hammock, providing insulation without compression. Essential for cold weather.
Alternative: Sleeping pad inside hammock works but can be awkward and slip around.
Weight varies: Similar to equivalent sleeping bag systems.
Weight Comparison
Hammock System vs. Ground System
Ultralight hammock setup:
| Item | Weight |
|---|---|
| Hammock | 14 oz |
| Suspension | 4 oz |
| Tarp (10ft) | 12 oz |
| Bug net | 5 oz |
| Total shelter | 35 oz |
Ultralight ground setup:
| Item | Weight |
|---|---|
| 1P UL tent | 24-32 oz |
| Stakes | 2-3 oz |
| Total shelter | 26-35 oz |
The reality: Comparable weights for three-season setups. Hammocks don't automatically save weight—they trade-off differently.
Cold Weather Changes the Equation
Hammock + underquilt: Add 16-24 oz for underquilt vs. sleeping pad you'd carry anyway.
Ground + pad: Sleeping pad serves as insulation automatically.
Cold weather verdict: Ground systems are lighter and simpler for cold weather bikepacking.
Practical Setup
Finding Hang Sites
Ideal tree spacing: 12-15 feet between suitable trees.
Tree diameter: 6+ inches preferred. Larger trees mean more stability.
Tree health: Avoid dead trees, widow-makers, or obviously unstable trees.
Ground clearance: Hang high enough for comfortable sitting height but low enough for safety.
Hang Angle
30-degree angle: The standard recommendation. Strap to ridge line forms roughly 30-degree angle.
Too flat: Uncomfortable, structural stress on hammock.
Too steep: Better lay but harder on trees and straps.
Achieving Flat Lay
Diagonal technique: Lie at slight angle across hammock rather than perfectly head-to-foot. Creates flatter position.
Sleeping position: Many hammock sleepers prefer slight head elevation. Adjust hang angle as needed.
Practice at home: Learn your preferred setup before depending on it in the field.
Tarp Positioning
Height: Tarp ridge 12-18 inches above hammock. Low enough for protection, high enough for headroom.
Angle: Stake out edges for rain runoff. Adjust pitch based on conditions.
Door positioning: Orient for wind direction and access preference.
Bikepacking-Specific Considerations
Packing Hammock Gear
Stuff sacks vs. loose: Hammocks stuff into small sacks. Tarps can be more awkward. Consider compression.
Where to pack:
- Hammock/tarp in handlebar bag (largest items)
- Straps/suspension in frame bag
- Stakes/guylines wherever convenient
Access: Hammock setup takes longer than tents. Don't bury it too deep.
Setup Time
Reality check: Hammock setup takes 5-15 minutes once proficient. Finding good trees adds variable time.
Comparison: Freestanding tents set up faster. Hammocks require site selection.
Takedown: Similar time to tents. Packing damp tarp can be annoying.
Mixed-Route Strategies
Backup plan essential: If route has treeless sections, you need ground backup.
Options:
- Carry minimal bivy for emergencies
- Use tarp as ground shelter with pad
- Accept some nights won't be in hammock
- Choose routes with consistent trees
Who Should Consider Hammocks
Likely Hammock Success
You might thrive with hammock bikepacking if:
- Your routes consistently pass through forest
- You find tents uncomfortable (back issues, claustrophobia)
- You're already a hammock camper and know you prefer it
- Warm/humid conditions dominate your riding season
- You value ground clearance in wet environments
Likely Hammock Frustration
Hammocks may disappoint if:
- Your routes include significant above-treeline or desert sections
- You've never hammock camped and are optimizing prematurely
- Cold weather bikepacking is your focus
- You ride with partners who don't use hammocks
- Quick camp setup matters to you
The Test
Before committing to hammock for bikepacking:
- Buy/borrow a hammock system
- Practice setup and sleeping at home
- Take a short overnight on local trails
- Evaluate honestly: is this better for you?
Don't invest hundreds of dollars and carry hammock gear on a major trip without testing the approach.
The Backyard Progression: Learning Hammock Camping
If you're curious about hammocks, here's a structured way to find out if they work for you:
Week 1: The Backyard Hang Set up in your backyard (or a friend's). Practice:
- Finding the right hang angle (30 degrees from horizontal)
- Getting the diagonal lay that flattens your sleeping position
- Setting up the tarp in "good weather" mode
- Packing everything back up efficiently
Time yourself. First setup: probably 20 minutes. Goal: under 10 minutes.
Week 2: The Overnight Test Sleep in your backyard hammock for a full night:
- Go to bed at normal bikepacking time (when it gets dark)
- No cheating—stay in the hammock until morning
- Note: Did you sleep well? Wake up with back pain? Stay warm enough?
- Morning verdict: Would you do this for 5 nights straight?
Week 3: The Weather Test Pick a night with light rain forecasted. Set up your full system with tarp. Sleep through it.
- Did the tarp protect you?
- How much condensation formed?
- Did wind affect your sleep?
- Would this have been better in a tent?
Week 4: The Real Test Take your hammock system on a short overnight ride—somewhere you can bail if it doesn't work:
- Did you find suitable trees?
- How long did site selection add to your day?
- Were you rested enough for day 2?
The Honest Results: Most people who complete this progression fall into two camps:
- "This is amazing, I'm never going back to tents"
- "This was interesting, but tents are easier for me"
Both answers are valid. The month of testing costs nothing if you borrowed or bought budget gear, and it prevents buying expensive hammock systems you'll never use.
Recommended Setup
Budget-Friendly Start
For testing hammock bikepacking:
- Basic gathered-end hammock (~$50-80)
- Simple tree straps (~$20-30)
- Rectangular tarp (~$30-50)
- Separate bug net if needed (~$30-40)
Total: $130-200 to test the concept.
Proven System
For committed hammock bikepackers:
- Warbonnet Blackbird or Dutchware Chameleon hammock
- Whoopie sling suspension
- Hammock Gear tarp or Warbonnet tarp
- Quality underquilt for cold (if needed)
Investment: $300-600 for complete quality system.
FAQ
Is hammock camping lighter than tent camping?
Not automatically. Three-season weights are comparable. Cold weather hammock systems (with underquilts) are often heavier than ground systems with sleeping pads.
Can I use my regular sleeping bag in a hammock?
Yes, but compressed insulation beneath you won't keep you warm. You'll need underquilt or pad beneath the sleeping bag.
What if I can't find trees?
That's the fundamental hammock limitation. Options: carry emergency bivy, use tarp for ground shelter, or accept that hammocks don't work everywhere.
Will hammock camping hurt trees?
Proper wide straps distribute weight and don't damage bark. Never use cord or rope directly on trees.
Can couples hammock camp together?
Each person needs their own hammock. Finding four suitable trees adds complexity. Many couples use mixed setups (one hammock, one ground).
The Verdict
Hammock bikepacking works—for specific people on specific routes. It's not a universal upgrade over ground sleeping. It's a different approach with different trade-offs.
If your routes pass through continuous forest, you find ground sleeping uncomfortable, and you're willing to learn the system, hammocks offer genuine benefits.
If you're optimizing weight, riding varied terrain, or new to both bikepacking and hammock camping, start with a tent or bivy. Add hammock skills later if it appeals.
For ground-based shelter options, see our Best One-Person Tents and Bivys Guide. For complete camp setup, check our Camp Gear Guide.
Find where you sleep best. The adventure continues either way.


