How to Resupply on Long Bikepacking Routes
20+ years testing gear in Colorado backcountry
Resupply Is Route Strategy
On trips longer than 3-4 days, food logistics become as important as the route itself. Carrying a week of food weighs 10+ pounds—impractical for most riders. Strategic resupply keeps daily weight manageable while ensuring you never run short. For first-time trip planning, see our first bikepacking trip guide.
The challenge: resupply options vary dramatically. A route through populated areas offers grocery stores every 50 miles. A remote wilderness route might have a single gas station in 200 miles. Your resupply strategy must match your terrain.
This guide covers everything you need for resupply success: researching options, timing your stops, using mail drops, and handling the unexpected when that "grocery store" turns out to sell only beer and bait.
For food recommendations, see our Complete Bikepacking Food Guide. For meal planning by trip length, check Bikepacking Meal Planning.
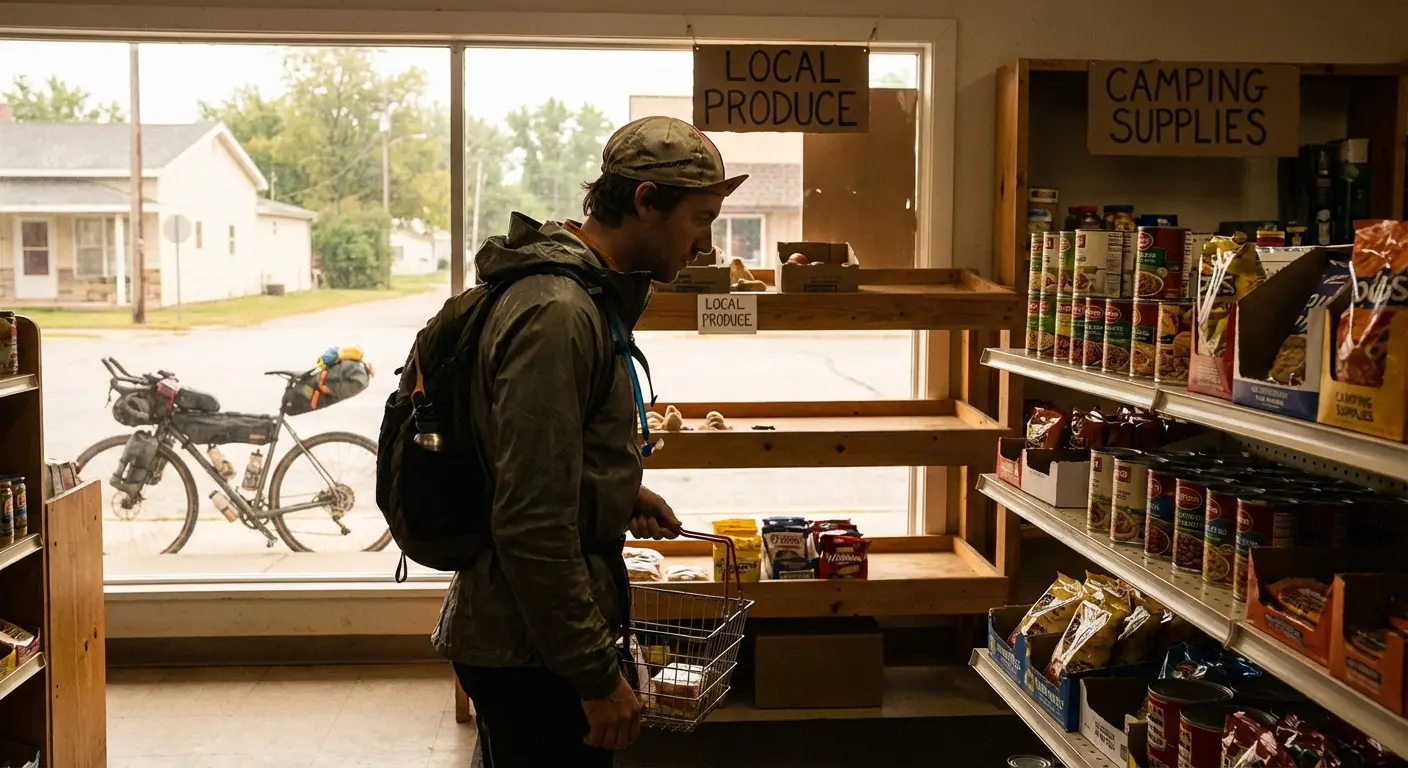
Understanding Resupply Options
Tier 1: Full Grocery Stores
What you get: Complete food selection—fresh produce, meat, dairy, full snack aisles, bakery, prepared foods.
Best for: Restocking everything, fresh food boost, variety.
Found in: Towns of 5,000+ population, along major highways.
Strategy: Plan major resupply around these. Stock up for multiple days.
Tier 2: Small-Town Grocery
What you get: Basic selection—staples, some produce, limited variety. Often higher prices.
Best for: Filling gaps, basic resupply.
Found in: Small towns (500-5,000), county seats.
Strategy: Don't count on specialty items. Good for basics like bread, peanut butter, cheese.
Tier 3: Gas Stations / Convenience Stores
What you get: Snacks, candy, jerky, chips, sometimes sandwiches. Very limited nutrition.
Best for: Emergency calories, topping off snacks.
Found in: Along highways, small communities.
Strategy: Backup option only. Don't plan your nutrition around gas station food.
Tier 4: Restaurants / Diners
What you get: Hot prepared meals, real food. No packable provisions.
Best for: Morale boost, calorie loading before a stretch, enjoying the journey.
Found in: Varies widely. More reliable in tourist areas.
Strategy: Budget time for town meals—they matter for morale and nutrition variety.
Tier 5: Mail Drops
What you get: Exactly what you send yourself.
Best for: Remote routes, specialty dietary needs, guaranteed supplies.
Found at: Post offices, hotels, hostels, sometimes outfitters.
Strategy: Requires advance planning. Essential for wilderness routes.
Pre-Trip Research
Good resupply planning happens before you leave home.
Step 1: Map Your Route's Services
For each potential stop:
- What's there? Grocery, gas station, restaurant?
- Hours? Small-town stores close early; many close Sundays
- Seasonal? Tourist-area businesses may close off-season
- Still open? Verify—rural businesses close permanently
Research Tools
Google Maps: Shows business locations and often hours. Check recent reviews for current status.
Google Street View: See what the town actually looks like. That "grocery store" might be a tiny market.
Yelp/TripAdvisor: Reviews often mention food availability and hours.
Route-specific resources: Many popular routes (Great Divide, TransAm) have rider forums with current resupply info.
Call ahead: For critical stops, actually call. "Hi, I'm bike touring through next week—can you confirm your hours and that you have basic groceries?"
Step 2: Calculate Food Carries
Based on your research, determine:
- Longest stretch between resupply options
- Food weight needed for each segment
- Backup options if primary resupply fails
Sample route analysis:
| Segment | Miles | Days | Resupply Options | Food to Carry |
|---|---|---|---|---|
| Start → Town A | 85 | 2 | Town A: small grocery | 2.5 days |
| Town A → Town B | 120 | 3 | Town B: full grocery | 3.5 days |
| Town B → Town C | 180 | 4-5 | Town C: gas station only | 5.5 days + backup |
| Town C → Finish | 60 | 1.5 | Finish: full services | 2 days |
Step 3: Plan Mail Drops (If Needed)
For segments with limited resupply, mail yourself food:
- Identify post office in town before the gap
- Confirm post office hours and General Delivery acceptance
- Send package to arrive before you do (allow extra days)
Mail Drop Strategy
When to Use Mail Drops
Good candidates:
- Remote routes with 4+ day gaps between towns
- Specialty dietary needs (vegan, GF, allergies)
- Preference for specific foods unavailable in small towns
- Routes through areas with unreliable services
Usually unnecessary:
- Routes through populated areas
- Trips under a week
- Flexible riders comfortable with available food
How to Send Mail Drops
General Delivery: Most US post offices accept packages addressed to:
Your Name
General Delivery
Town Name, State ZIP
Hold time: Usually 10-30 days (ask when calling)
Important: Call ahead to confirm the post office accepts General Delivery and their specific hold time.
Alternative pickup locations:
- Hotels/motels (if staying there)
- Bike shops (often helpful)
- Outfitters (common in trail towns)
- Friends/contacts along the route
What to Include
Essential:
- Enough food for the upcoming segment
- Specific items unavailable in small towns
- Any medications or supplements
Nice to have:
- Fresh socks or other consumables
- Maps for next section
- Backup gear (spare tube, chain lube)
Don't include:
- More than you need (creates waste if plans change)
- Perishables (unless timing is precise)
- Items available everywhere (no need to mail peanut butter)
Mail Drop Timing
Send packages: At least 7-10 days before expected arrival Buffer: Better early than late—packages can wait; you can't Tracking: Use tracking numbers for peace of mind
Timing Your Resupply Stops
The Calculation
Daily consumption: 1.5-2 lbs of food Safety margin: +1 day extra food beyond calculated Weight tolerance: How much are you willing to carry?
Example:
- 3-day segment to next resupply
- 2 lbs/day × 3 days = 6 lbs food needed
- +1 day safety = 8 lbs total
- Already carrying: 1 lb remaining
- Need to buy: 7 lbs
Resupply Frequency Strategies
Frequent resupply (every 1-2 days):
- Pros: Lighter daily weight, fresher food, more flexibility
- Cons: More time in towns, harder on remote routes
- Best for: Populated routes, riders who enjoy town stops
Moderate resupply (every 3-4 days):
- Pros: Balance of weight and independence
- Cons: Requires planning, heavier carry days
- Best for: Most bikepacking trips
Infrequent resupply (5+ days):
- Pros: Maximum wilderness time, fewer stops
- Cons: Heavy carries, monotonous food, risk if miscalculated
- Best for: Remote routes, experienced riders
Timing Within the Day
Morning resupply:
- Pros: Full selection, staff available for questions
- Cons: Carrying food weight all day
Afternoon resupply:
- Pros: Lighter morning riding, eat some food before buying more
- Cons: Limited hours in small towns, stock may be depleted
Evening arrival:
- Pros: Fresh food for dinner, lightest carry
- Cons: Store may be closed, no backup options
Best practice: Arrive with enough food to survive if the store is closed. Never count on a single option.
What to Buy at Each Stop
Small-Town Grocery Priorities
Limited selection means smart choices. Prioritize:
- Calorie-dense items: Peanut butter, nuts, cheese, crackers
- Protein sources: Cheese, canned tuna (if no pouches), jerky
- Fresh morale foods: Bananas, apples, bread
- Resupply staples: Oatmeal, tortillas, snack bars
Skip: Heavy canned goods (unless you'll eat immediately), bulky low-calorie items.
Gas Station Strategy
When it's your only option:
Best bets:
- Nuts and trail mix (usually available)
- Jerky (protein source)
- Peanut butter crackers (surprisingly decent)
- Candy and chocolate (calories)
- Energy bars (often available)
- Bananas (often available)
- Sandwiches (if fresh)
Avoid:
- Hot dogs and roller food (questionable freshness)
- Heavy drinks (water is lighter)
- Items you won't eat
Reality check: Gas station resupply is survival mode, not optimization. Get enough calories to reach real food.
Full Grocery Maximization
With good options available (see our budget food guide for affordable options):
- Eat fresh first: Salad bar, deli, bakery—eat before leaving
- Buy for the segment: Calculate days to next resupply
- Include treats: Morale matters on long trips
- Fresh for Day 1: Items that won't travel (fresh bread, ripe fruit)
Handling Resupply Failures
When the Store Is Closed
Immediate options:
- Find another store (gas station, convenience)
- Restaurant meal to load calories
- Ask locals (sometimes there's an option you missed)
- Ration existing food and push to next stop
Prevention:
- Never arrive with zero food
- Carry 1+ day emergency beyond calculated needs
- Have backup resupply identified
When Selection Is Limited
That "grocery store" has only chips, beer, and canned goods.
Strategy:
- Buy the best available (calories are calories)
- Look for hidden gems (peanut butter, nuts, crackers often exist)
- Supplement with restaurant meal
- Adjust expectations and push on
When You're Running Low
If miscalculation or bad luck leaves you short:
- Ration: Cut portions by 30-50%, prioritize high-calorie items
- Find calories: Gas stations, vending machines, ask at houses
- Adjust route: If possible, divert to resupply sooner
- Push: Sometimes the answer is harder miles on less food
Preventing this situation:
- Always carry extra beyond calculated needs
- Don't pass resupply options when food is low
- Track consumption vs. remaining supply
Route-Specific Considerations
For beginner-friendly routes with easier resupply, see our best beginner bikepacking routes.
Popular Routes with Established Resupply
Great Divide Mountain Bike Route:
- Generally 2-4 days between towns
- Well-documented resupply options
- A few challenging sections (New Mexico, Montana)
- Resources: Adventure Cycling maps, numerous online guides
TransAmerica Trail:
- Frequent resupply through most sections
- Rural Midwest can have long stretches
- Restaurant options more common
- Resources: Adventure Cycling maps, warmshowers hosts
Arizona Trail:
- Significant wilderness sections
- Mail drops essential for through-hikers/bikers
- Limited water affects food choices (more dry foods)
- Resources: AZT Association, thru-rider journals
International Considerations
Resupply abroad adds complexity:
Research: Food availability varies by country. Research what's common. Language: Learn food-related vocabulary Currency: Some small towns are cash-only Hours: Sunday closures are standard in many countries Mail drops: International mail is slower and less reliable
Tracking and Adjusting
Daily Food Audit
Each evening, quick assessment:
- Food remaining
- Days to next resupply
- Daily consumption rate
- Any needed adjustments
When to Adjust
Eat more if:
- Behind on calories (feeling depleted)
- Next resupply is soon
- Weather is cold (need more fuel)
Eat less if:
- Running short on food
- Resupply is uncertain
- Already carrying excess
Learning Your Consumption
After a few days, you'll know your actual consumption rate:
- Higher altitude = more calories needed
- Harder terrain = more calories needed
- Hot weather = less appetite (but still need fuel)
- Cold weather = more calories needed
Adjust future planning based on actual experience.
Common Mistakes
Mistake 1: Trusting Google Hours
That "Open until 9pm" listing is from 2019. Hours change, especially seasonally.
Fix: Call critical stops. Check recent reviews for current info.
Mistake 2: Counting on One Option
If your plan depends on a single store being open, it will be closed.
Fix: Identify backup options. Arrive with buffer food.
Mistake 3: Skipping Resupply When Available
"I have enough food, I'll skip this stop" → Murphy's Law activates.
Fix: Top off when you can. You can always eat more later.
Mistake 4: Under-Planning Remote Sections
That 200-mile wilderness section looked manageable on the map.
Fix: Research thoroughly. Calculate conservatively. Use mail drops.
Mistake 5: Over-Packing Food
Carrying 8 days of food when resupply is 3 days away wastes energy.
Fix: Plan precisely. Carry safety margin, not excess.
FAQ
How many days of food should I carry maximum?
Most bikepackers find 5-7 days practical (7-10+ lbs of food). Beyond that, weight significantly impacts riding. Use mail drops for longer gaps.
Should I always use mail drops?
Only for remote routes or special dietary needs. For populated routes, stores are more flexible than fixed mail drops.
What if a mail drop doesn't arrive?
Have a backup plan. Know what local options exist. Allow extra mail transit time.
How do I find resupply info for a specific route?
Start with route-specific resources (Adventure Cycling maps, trail associations). Check forums and rider blogs for recent reports. Call ahead for critical stops.
Is it worth stopping at every possible resupply?
Not necessarily. Balance frequency against time. But never pass resupply when you're getting low on food.
What's the best safety margin?
Carry at least 1 extra day of food beyond calculated needs. In remote areas, consider 2 days extra.
Quick Reference: Resupply Checklist
Before the trip:
- Map all resupply options on route
- Verify hours and seasonal closures
- Calculate food carries for each segment
- Arrange mail drops if needed
- Identify backup options for critical sections
At each stop:
- Buy enough for segment + safety margin
- Check hours for next potential stop
- Eat fresh food before leaving
- Top off water
Daily tracking:
- Food remaining vs. days to resupply
- Adjust consumption if needed
- Note actual consumption rate for future planning
For food recommendations, see our Complete Bikepacking Food Guide. For meal planning strategies, check Bikepacking Meal Planning.
Plan smart. Carry enough. Never bonk.


