Best Bike Lights for Overnight Bikepacking: Complete Guide
20+ years testing gear in Colorado backcountry
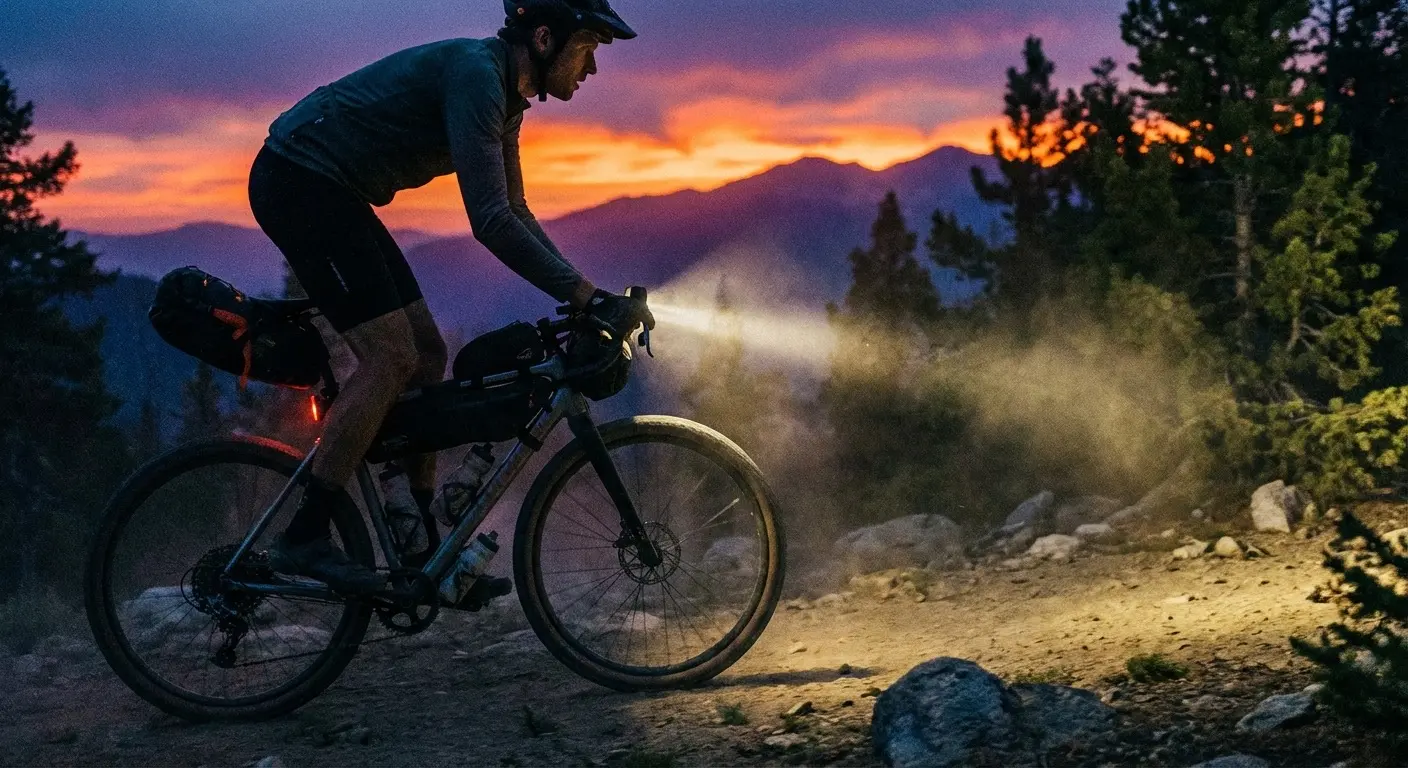
Why Lighting Matters More on Bikepacking Trips
Bike lights on a bikepacking trip aren't just about being seen—they're about seeing. When you're 30 miles from town on a singletrack descent at dusk, your headlight becomes the difference between safely navigating to camp and a terrifying crash. As BIKEPACKING.com's lighting guides explain, lighting requirements for off-road adventures differ significantly from commuter cycling.
Bikepacking demands more from lights than commuting. You need enough output to illuminate rough terrain. You need enough runtime to handle extended night riding or pre-dawn starts. You need reliability because there's no bike shop if something fails. And you need to consider weight and charging logistics alongside raw performance.
This guide covers everything from budget-friendly USB rechargeable options to expedition-ready dynamo setups. We'll help you match the right lighting system to your riding style and trip demands.
For complete gear guidance, see our Complete Bikepacking Gear Guide.
Understanding Light Output
Lumens: What the Numbers Mean
Lumens measure total light output. Higher numbers mean more light—but the relationship isn't linear. Doubling lumens doesn't double perceived brightness; diminishing returns set in quickly.
Guidelines for bikepacking:
- 200-400 lumens: Adequate for smooth gravel roads at moderate speeds
- 500-800 lumens: Good for most bikepacking conditions, handles moderate technical terrain
- 1000+ lumens: Excellent for technical singletrack, high-speed descents, or pitch-dark conditions
Beam Pattern Matters More Than Lumens
Two lights with identical lumen ratings can perform vastly differently based on beam pattern. Wide floods illuminate your peripheral vision and close-range terrain. Tight spots throw light far but create tunnel vision.
For bikepacking: A medium-width beam works best. You need enough peripheral coverage to see trail edges and approaching obstacles, plus enough throw to react to what's ahead at speed.
Runtime Realities
Manufacturer runtime claims are optimistic. They're measured at lowest output, often with fresh batteries at ideal temperature. Real-world runtime at useful brightness levels is often 50-70% of claimed figures.
Rule of thumb: Plan for roughly half the manufacturer's claimed runtime on high mode. If you need four hours of light, choose a light rated for eight or more.
The Pre-Dawn Test: Know Your Lights Before You Need Them
Before any trip involving night riding, run this test at home:
The Yard Test (30 minutes after dark):
- Mount both lights on your bike exactly as you'll use them
- Ride around your neighborhood or a local trail—somewhere with varied terrain
- Test each brightness mode: What's usable? What drains battery too fast?
- Verify your taillight is visible from 200+ feet behind you
- Check mount security after 15-20 minutes of riding
What This Reveals:
- Beam pattern reality: That 1000-lumen light might have a narrow spot that misses obstacles at your sides
- Usable brightness: You may find 600 lumens sufficient where you expected to need 1000
- Battery anxiety points: How fast does the battery indicator drop on high?
- Mount problems: Lights that vibrate loose on rough pavement will definitely fail on trails
The Critical Lesson: Most bikepackers discover their light setup has issues on the first real night ride—often at the worst possible moment. Better to learn in your neighborhood than 30 miles from anywhere.
What Experienced Night Riders Know:
- Backup light (even a cheap headlamp) is essential, not optional
- Fully charge the night before departure, not the morning of
- Cold weather cuts battery life by 20-40%
- Your eyes take 20-30 minutes to fully adapt to darkness
For more on staying visible and safe after dark, see our Night Riding Safety Gear Guide.
USB Rechargeable Lights: The Bikepacking Standard
USB rechargeable lights dominate bikepacking because they integrate with the charging ecosystem you're already carrying. Your phone charger works for your lights, power bank tops them off, and solar panels can recharge the system in the field.
What to Look For
Runtime at useful output: Not the maximum burst mode, but the output you'll actually use (typically 400-600 lumens for most riding).
Mounting security: Vibration on rough terrain loosens many mounts. Rubber strap mounts work well; clamp mounts need periodic checking.
Water resistance: IPX4 handles rain and splashes. IPX5+ provides confidence in sustained downpours.
Charge time: How long to go from dead to full? Fast charging matters when you're managing limited charging windows.
Featured Products
NiteRider Lumina 1200 Boost
NiteRider's Lumina series has earned its reputation over years of reliable performance. The 1200 Boost delivers genuine 1200 lumens when you need it, with intelligent stepped modes that balance output and runtime. The beam pattern works well for both road and trail use—wide enough to see trail edges without excessive spread that wastes light. Runtime hits about 1.5 hours on high, 3 hours on medium, and 18+ hours on lowest settings. The rugged aluminum body handles crashes and weather, and the secure mount stays put on rough terrain. It's the light trusted by ultra-distance racers and weekend bikepackers alike.
- 1200 lumens maximum output
- Multiple brightness modes
- USB rechargeable
- Durable aluminum construction
- Secure mounting system
NiteRider Lumina 1000 Boost
If you don't need maximum output, the 1000 Boost offers the same quality at a lower price. The output difference between 1000 and 1200 lumens is barely perceptible in real use, and the runtime per lumen actually improves slightly. The same secure mount, same beam pattern, same reliability—just marginally less peak output. For most bikepacking conditions (moderate terrain, reasonable speeds), 1000 lumens is plenty. Save the difference for other gear.
- 1000 lumens max output
- Same quality as 1200 model
- Excellent runtime efficiency
- USB rechargeable
- Proven reliability
Ovetour 1000 Lumens Bike Light
Ovetour delivers surprisingly capable performance at entry-level pricing. The 1000 lumen output handles legitimate night riding, not just being-seen duties. The 4000mAh battery provides excellent runtime—6-8 hours at medium brightness is realistic. The power bank function lets you charge phones or GPS units in a pinch, adding emergency utility. Some compromises exist: the mount isn't as secure as NiteRider's, build quality is good-not-great, and beam pattern is less refined. For budget-conscious bikepackers or those testing night riding before investing heavily, this light punches above its weight.
- 1000 lumens output
- 4000mAh battery with power bank function
- 6-18 hour runtime
- IPX5 waterproof
- Budget-friendly price
Cygolite Hotshot Pro 150
The Hotshot Pro has been the gold standard for tail lights for years. At 150 lumens in dayflash mode, it's visible in bright sunlight—not just after dark. The six modes include steady options for trail riding (where flashing annoys fellow riders) and attention-grabbing flash patterns for road use. Runtime extends to 30+ hours on lower settings, meaning days between charges. The secure hard mount survives rough terrain without shifting. For bikepacking, the Hotshot Pro provides confidence that approaching vehicles see you without constant battery anxiety.
- 150 lumens daylight visible
- 6 lighting modes
- 30+ hour runtime
- USB rechargeable
- Secure hard mount
Cygolite Hotshot 100
The Hotshot 100 offers most of the Pro's performance at a lower price. The 100 lumen output still provides genuine visibility—adequate for most conditions even if not quite as aggressive as the 150. Same reliable mount, same mode options, same proven durability. For bikepackers who want quality rear lighting without maximum investment, the 100 delivers the essentials.
- 100 lumens output
- 6 lighting modes
- Up to 150 hour runtime
- USB rechargeable
- Wide visibility angle
Dynamo Lighting: The Expedition Solution
For multi-week expeditions or riders who refuse to manage charging logistics, dynamo lighting provides unlimited runtime. Your movement generates power—ride and your lights work forever.
Why Bikepackers Choose Dynamo
Zero battery anxiety: Your lights work as long as you're moving. No calculating runtime, no charging windows, no dead lights at 2 AM.
Integrated charging: Many dynamo headlights include USB outputs. Charge your phone while you ride—no external power bank required.
Reliability: Less to fail. No batteries to degrade, no charging ports to corrode. Dynamo systems often outlast the bikes they're mounted on.
The Trade-offs
Cost: Dynamo hubs and quality headlights cost significantly more than USB options. Expect $200-500+ for a complete setup.
Weight: Dynamo hubs add 200-400g over standard hubs.
Drag: All dynamos create some resistance. Modern designs minimize this, but it exists—roughly equivalent to a slight headwind.
Top Dynamo Options
Sinewave Beacon: Made in the USA, 750 lumens, integrated USB charging. The off-road beam pattern works brilliantly for bikepacking. Starts charging at only 5 mph—industry best. The Beacon is considered by many to be the finest dynamo headlight available.
Exposure Revo: Supercapacitor technology provides 10+ minutes of standlight when stopped. The light keeps working after you stop pedaling—useful for camp setup or mechanical repairs.
B&M IQ-X: German engineering at a more accessible price point than premium options. 100 lux output with standlight and integrated USB on some models.
Helmet Lights: The Visibility Upgrade
Handlebar-mounted lights illuminate the trail ahead. Helmet-mounted lights illuminate where you're looking—different, and often more useful on technical terrain.
Why Add a Helmet Light
Look-ahead visibility: Your eyes rarely point straight ahead on technical trails. A helmet light follows your gaze, illuminating the next move before your bars point there.
Improved depth perception: Two light sources from different angles create shadows that reveal terrain features a single source flattens.
Backup system: If your bar light fails, a helmet light keeps you moving.
When to Skip the Helmet Light
For smooth roads and moderate terrain, a single quality bar light suffices. Helmet lights add complexity, weight, and another battery to manage. They shine on technical singletrack but are overkill for gravel roads.
Managing Power on Multi-Day Trips
Charging Strategy
Integrate light charging into your overall power management. The same power bank that tops off your phone handles your lights. The same charging window at a coffee shop or campground covers everything. For portable power options, see our Best Portable Chargers Guide.
Priority order for limited power:
- Navigation (phone or GPS)
- Headlight (if expecting night riding)
- Tail light (charges fast, lasts longest)
Backup Options
Any lighting system can fail. Carry a minimal backup:
- Cheap AAA-powered headlamp (for camp tasks if main light fails)
- Small clip-on blinkie (for emergency tail light)
This backup weighs ounces and provides get-to-safety capability. For a complete list of essential backup items, see our Emergency Gear Guide.
Solar Charging Reality
Small portable solar panels can charge USB devices, including lights. In practice, they're slow and dependent on conditions. They work as supplemental charging for extended trips but rarely as primary power sources.
Mounting Considerations
Bar Mounts
Most lights mount to handlebars via rubber straps or clamps. Check compatibility with your bar diameter—some road bars require specific adapters. Oversized MTB bars may need extension mounts.
Pro tip: Mount lights on the bar extension ahead of brake levers. This positions the light for best illumination and keeps cables clear.
Helmet Mounts
Many bike lights offer optional helmet mounts. Secure attachment matters—a light flying off during a descent ranges from annoying to dangerous. Verify the mount is rated for your light's weight.
Saddle and Seatpost Mounts
Tail lights typically mount to seatposts via rubber straps or clip to saddle rails. Bikepacking saddle bags can obscure rear lights—check visibility with your loaded bike before your trip.
FAQ
How bright a light do I need for bikepacking?
500-800 lumens handles most conditions. Go brighter (1000+) for technical singletrack or fast descents in complete darkness. Go dimmer (300-400) if you're primarily riding roads and want longer runtime.
How long should battery runtime last?
Plan for your longest expected night riding session, then add 50% margin. If you expect 3-hour nights, choose a light with 4.5+ hours at useful brightness. For expedition riding, consider dynamo systems.
USB rechargeable or dynamo?
USB rechargeable for most bikepackers—simpler, lighter, cheaper. Dynamo for multi-week expeditions, riders who hate charging logistics, or those building dedicated bikepacking bikes.
Do I need a tail light for bikepacking?
Yes. Even if you're rarely on roads, you'll encounter vehicles eventually. The Cygolite Hotshot weighs almost nothing and lasts for days—no excuse to skip it.
Building Your Setup
Standard setup: NiteRider Lumina 1000 front + Cygolite Hotshot 100 rear. Handles most bikepacking conditions with proven reliability.
Technical terrain: NiteRider Lumina 1200 front + Hotshot Pro 150 rear. More output for demanding conditions.
Budget-conscious: Ovetour 1000 front + Hotshot 100 rear. Capable performance without premium pricing.
Expedition: Dynamo system with Sinewave Beacon—unlimited runtime and integrated charging for multi-week adventures.
For complete gear recommendations, see our Complete Bikepacking Gear Guide. Pair your lights with the right navigation setup using our GPS and Navigation Devices guide.
For trip planning that includes night riding considerations, see our First Trip Planning Guide. Building a complete setup? Check our Budget Bikepacking Setup Under $500.
Light the way. The trail continues after dark.


